

- Enable IP routing globally
- Select Routing > IP > Basic > IP Configuration.
A screen similar to the following displays.
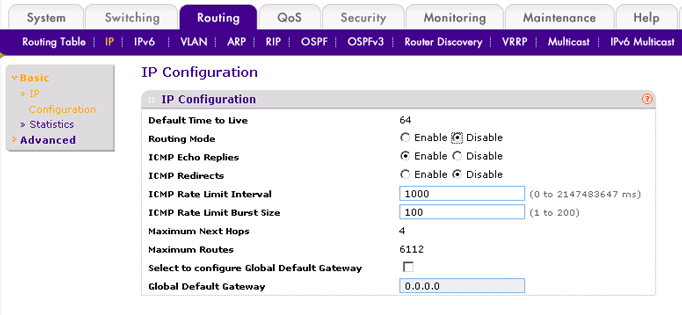
- For Routing Mode, select the Enable radio button.
- Click Apply to apply the settings.
- Select Routing > IP > Basic > IP Configuration.
- Enable IPv6 unicast globally
- Select Routing > IPv6 > Basic > Global Configuration.
A screen similar to the following displays.
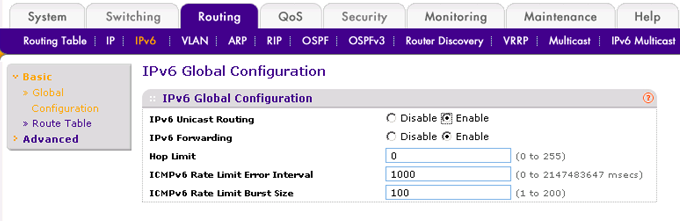
- For IPv6 Unicast Routing, select the Enable radio button.
- Click Apply to apply the setting.
- Select Routing > IPv6 > Basic > Global Configuration.
- Enable IPv6 address on interface 1/0/9.
- Select Routing > IPv6 > Advanced > Interface Configuration.
A screen similar to the following displays.
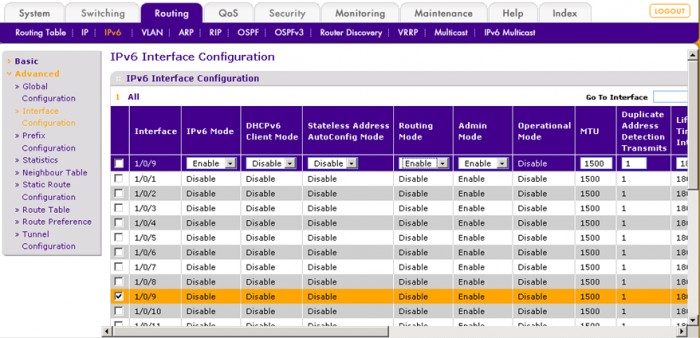
- Scroll down and select the interface 1/0/9 check box.
Now 1/0/9 appears in the Interface field at the top.
- Enter the following information:
- In the IPv6 Mode field, select Enable.
- In the Routing Mode field, select Enable.
- Click Apply to apply the settings.
- Select Routing > IPv6 > Advanced > Interface Configuration.
- Configure prefix on interface 1/0/9.
- Select Routing > IPv6 > Advanced > Prefix Configuration.
A screen similar to the following displays.
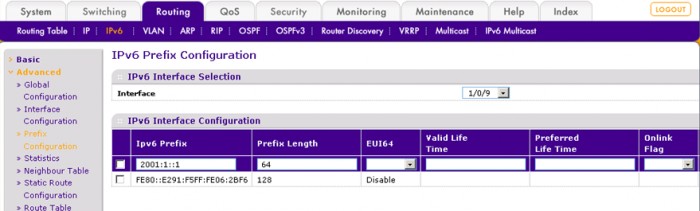
- Scroll down and select interface 1/0/9.
- Enter the following information:
- In the IPv6 Prefix field, enter 2001:1::1.
- In the Prefix Length field, select 64.
- Click Add to create IPv6 prefix to interface 1/0/9.
- Select Routing > IPv6 > Advanced > Prefix Configuration.
- Enable DHCPv6 Server Configuration
- Select System > Services > DHCPv6 Server > DHCPv6 Server Configuration.
A screen similar to the following displays.
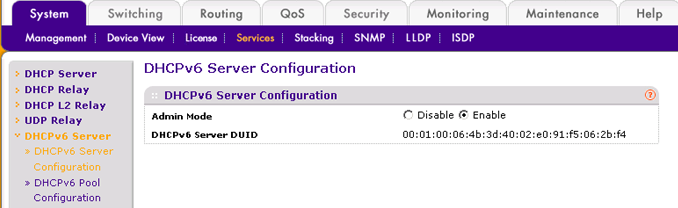
- For Admin Mode, Select the Enable radio button.
- Click Apply to apply the setting.
- Select System > Services > DHCPv6 Server > DHCPv6 Server Configuration.
- Create a DHCPv6 pool named pool1.
- Select System > Services > DHCP Server > DHCPv6 Pool Configuration.
A screen similar to the following displays.
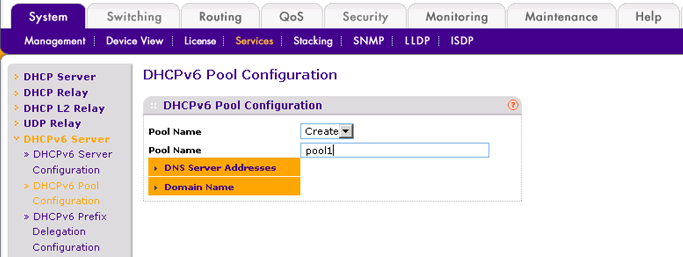
- From the Pool Name drop-down list, select Create.
- In the Pool Name field, enter pool1.
- Click Apply to apply the setting.
- Select System > Services > DHCP Server > DHCPv6 Pool Configuration.
- Configure prefix in the pool1
- Select System > Services > DHCPv6 Server > DHCPv6 Pool Configuration.
A screen similar to the following displays.
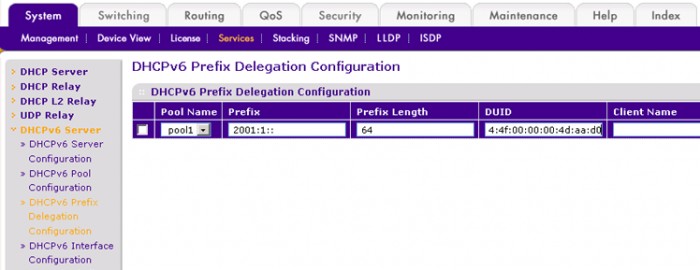
- From the Pool Name drop-down list, select Pool1.
- Enter 2001:1:: in the Prefix field.
- In the Prefix Length field, enter 64.
- In the Prefix field, enter 00:01:00:01:15:40:14:4f:00:00:00:4d:aa:d0.
- Click Apply to apply the setting.
- Select System > Services > DHCPv6 Server > DHCPv6 Pool Configuration.
- Configure DHCPv6 on interface 1/0/9.
- Select System > Services > DHCPv6 Server > DHCPv6 Interface Configuration.
A screen similar to the following displays.
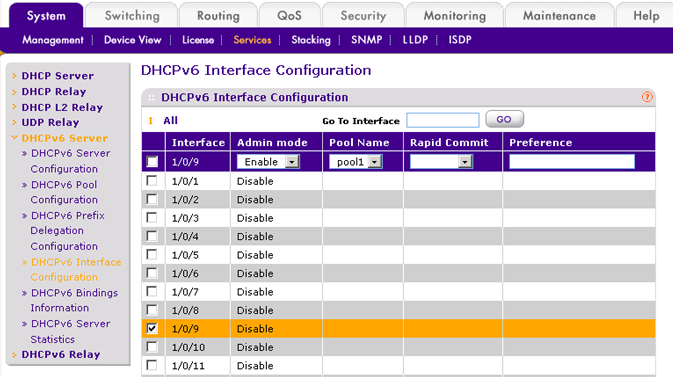
- Scroll down and select the interface 1/0/9 check box. Now 1/0/9 appears in the Interface field at the top.
- Enter the following information:
- In the Admin mode field, select Enable.
- In the Pool Name field, enter pool1.
- In the Administrative Mode field, select Enable.
- Click Apply to apply the settings.
- Select System > Services > DHCPv6 Server > DHCPv6 Interface Configuration.
- Show DHCPv6 binding.
- Select System > Services > DHCPv6 Server > DHCPv6 Binding Information.
A screen similar to the following displays.
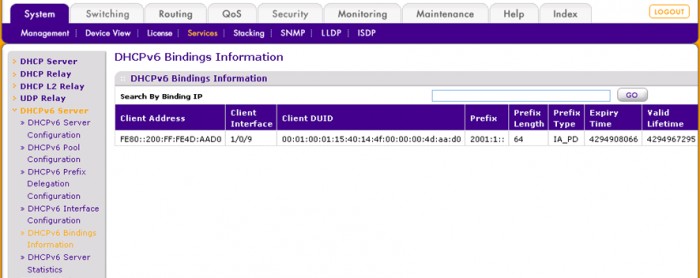
- Select System > Services > DHCPv6 Server > DHCPv6 Binding Information.
For more information, see the following support articles:
- What is Dynamic Host Configuration Protocol for IPv6 (DHCPv6) and how does it work with my managed switch?
- How do I configure Dynamic Host Configuration Protocol for IPv6 (DHCPv6) using CLI commands on my managed switch?
This article applies to the following managed switches and their respective firmware:
- M5300 - firmware version 10.0.0.x
-
- M5300-28G (GSM7228S)
- M5300-5G (GSM7252S)
- M5300-28G3 (GSM7328Sv2h2)
- M5300-52G3 (GSM7352Sv2h2)
- M5300-28G_POE+ (GSM7228PSv1h2)
- M5300-52G-POE+ (GSM7252PSv1h2)
- M5300-28GF3 (GSM7328FSv2)
- XSM7224S - firmware version 9.0.1.x (license required to support the feature described in this article)
Last Updated:07/07/2025
|
Article ID: 21937