

NETGEAR might periodically release firmware updates to improve the ReadyDATA. The firmware on the ReadyDATA is referred to as ReadyDATA OS. You can update the firmware on the ReadyDATA remotely from the NETGEAR website or manually from a local drive.
When you update the firmware, the stored data on the ReadyDATA is not affected. However, as a security measure, NETGEAR recommends that you back up the stored data, especially data that cannot be replaced, before you perform a firmware update.
If the ReadyDATA is installed at a location that does not have Internet access, you need to update your firmware locally.
WARNING: You cannot update the firmware if there are no volumes on the ReadyDATA. Before attempting to update the firmware, create at least one volume. Refer to the article How do I create a volume and select the RAID level on my ReadyDATA storage system?
To update firmware locally:
- Using a computer that has Internet access, download the latest firmware from ReadyDATA Product Page to a USB drive or connected computer.
- Connect the USB drive with the updated firmware file to your ReadyDATA.
- Select System > Settings > Update.
The following figure shows the Settings screen with the firmware options:
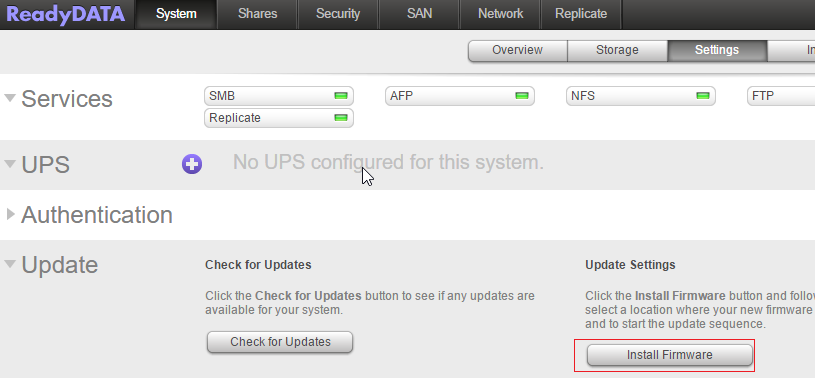
- Click Install Firmware.
The Update Firmware pop-up screen displays:

- Click Browse, navigate to the directory containing the updated firmware, and select it.
- Click Upload.
A status progress circle shows the progress of the firmware upload. After the firmware upload is complete, you are prompted to reboot the system.
Note: before your click reboot, please be sure that the device is not currently being used in production.


- Click Reboot under the Update heading.
If you enabled email alerts, the ReadyDATA sends a message when the firmware update finishes.
- (Optional) Verify that the ReadyDATA runs the new firmware.
Select System > Overview > Hardware. The Dashboard home screen displays.
Check which firmware version is listed in the firmware field.
