

From the Alerts/Logs menu, you can configure the logs, syslog, and the alarms, and specify the email address from which alerts originate.
Configure Log Settings
For the logs, you can either configure event tracing or select a log level. These selections are mutually exclusive.
Event tracing can help you to debug the wireless network. Event tracing generates logs from the wireless controller and from all controlled access points, and saves these logs in a file on the wireless controller. The file can become large quickly.
»To configure the log settings and view the logs:
- Open a web browser. In the browser's address field, type the http:// followed by the IP address that you assigned to the wireless controller.
By default, the IP address is 192.168.0.250. If you have not yet assigned another IP address to the wireless controller, type http://192.168.0.250.
The wireless controller's login screen displays. - Enter your user name and password.
If you have not yet personalized your user name and password, enter admin for the user name and password for the password, both in lowercase letters. - Click the Login button.
The wireless controller's web management interface opens and displays the Summary screen. - Select Configuration > System > Alerts/Logs > Logs/Syslog.
The Log Settings screen displays:
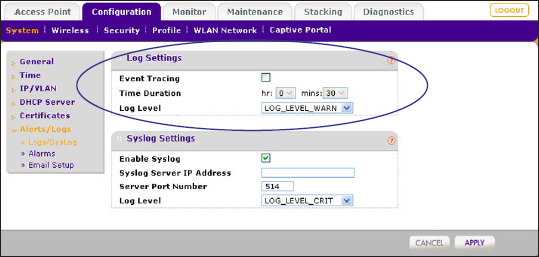
- In the Log Settings section of the screen, configure either event tracing or a log level (these selections are mutually exclusive):
o Event tracing. To configure event tracing:
a. Select the Event Tracing check box.
b. Next to Time Duration, use the menus to specify the period during which event tracing should occur.
o Log level. From the Log Level menu, select one of the following levels:
-LOG_LEVEL_CRIT. Critical errors only are logged.
-LOG_LEVEL_ERR. Noncritical errors and critical errors are logged.
-LOG_LEVEL_WARN. Warnings, noncritical errors, and critical errors are logged.
-LOG_LEVEL_NOTICE. Notifications, warnings, noncritical errors, and critical errors are logged.
-LOG_LEVEL_INFO. Informational messages, notifications, warnings, noncritical errors, and critical errors are logged. - Click the Apply button.
Configure Syslog Settings
This screen lets you configure the settings to connect to a syslog server, if you have one configured in your network.
Note:Before you configure the IP address of the syslog server on the wireless controller, make sure that you have set up a syslog server (such as a computer running a syslog service) and that the syslog server is available on the network.
»To configure syslog settings:
- Open a web browser. In the browser's address field, type the http:// followed by the IP address that you assigned to the wireless controller.
By default, the IP address is 192.168.0.250. If you have not yet assigned another IP address to the wireless controller, type http://192.168.0.250.
The wireless controller's login screen displays. - Enter your user name and password.
If you have not yet personalized your user name and password, enter admin for the user name and password for the password, both in lowercase letters. - Click the Login button.
The wireless controller's web management interface opens and displays the Summary screen. - Select Configuration > System > Alerts/Logs > Logs/Syslog.
The Log Settings screen displays:
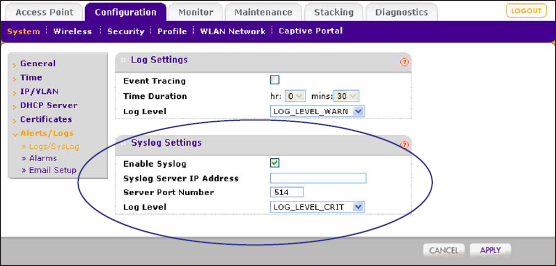
- In the Syslog Settings section of the screen, configure the settings as described in the following table:
Setting Description Enable Syslog
Enable the syslog settings, if you have a syslog server on your network. Syslog Server IP Address Enter the IP address to which the wireless controller and managed access points send all syslogs, if the Enable Syslog check box is selected.
Note: Before you configure the IP address of the syslog server on the wireless
controller, make sure that you have set up a syslog server (such as a computer
running a syslog service) and that the syslog server is available on the network.Server Port Number Enter the number of the port at which your syslog server is configured to listen to requests. Log Level From the Log Level menu, select one of the following levels:
• LOG_LEVEL_CRIT. Critical errors only are logged.
• LOG_LEVEL_ERR. Noncritical errors and critical errors are logged.
• LOG_LEVEL_WARN. Warnings, noncritical errors, and critical errors are logged.
• LOG_LEVEL_NOTICE. Notifications, warnings, noncritical errors, and critical errors are logged.
• LOG_LEVEL_INFO. Informational messages, notifications, warnings, noncritical errors, and critical errors are logged. - Click the Apply button.
Configure Alarm Notification Settings
You can classify certain events as critical, major, normal, or minor. Some events you can classify only as critical or major. For example, on the RF Management screen, you can specify whether a coverage hole should be classified as critical or major.
»To configure alarm actions:
- Open a web browser. In the browser's address field, type the http:// followed by the IP address that you assigned to the wireless controller.
By default, the IP address is 192.168.0.250. If you have not yet assigned another IP address to the wireless controller, type http://192.168.0.250.
The wireless controller's login screen displays. - Enter your user name and password.
If you have not yet personalized your user name and password, enter admin for the user name and password for the password, both in lowercase letters. - Click the Login button.
The wireless controller's web management interface opens and displays the Summary screen. - Select Configuration > System > Alerts/Logs > Alarms.
The Alarm Actions screen displays:
.png)
- For each alarm severity (Minor, Normal, Major, and Critical), select the desired action from its corresponding Action menu.
o No Action. When the alarm occurs, no action is taken.
o Add To Syslog. When the alarm occurs, the wireless controller adds an entry to the syslog.
o Send Email. When the alarm occurs, the wireless controller sends an email. - For each alarm severity for which you have selected the Send Email option in the previous step, enter an email address.
- Click the Apply button.
Configure the Email Notification Server
The email notification server is the location from which the email alerts originate.
»To configure email settings:
- Open a web browser. In the browser's address field, type the http:// followed by the IP address that you assigned to the wireless controller.
By default, the IP address is 192.168.0.250. If you have not yet assigned another IP address to the wireless controller, type http://192.168.0.250.
The wireless controller's login screen displays. - Enter your user name and password.
If you have not yet personalized your user name and password, enter admin for the user name and password for the password, both in lowercase letters. - Click the Login button.
The wireless controller's web management interface opens and displays the Summary screen. - Select Configuration > System > Alerts/Logs > Email Setup.
The Email Configuration screen displays:

- Configure the settings as described in the following table:
Setting Description Server Address
Enter the IP address of the server from which email notifications are sent.
Port Enter the port number of the server from which email notifications are sent. The default port is 25. ?
Sender Email Address
?
Enter the email address from which email notifications are sent. Authentication Required Select the Authentication Required check box if the email server requires authentication, and complete the User Name and Password fields.
User Name Enter the user name that is associated with the email server. Password Enter the password that is associated with the email server. - Click the Apply button.