

For information about the VLAN Routing Wizard, see the “What is the VLAN Routing Wizard on a smart switch
To use the VLAN Routing Wizard to create a new VLAN interface:
- Open a web browser.
- In the browser address field, type the IP address of the smart switch.
The default IP address is 192.168.0.239 and the default subnet mask is 255.255.255.0.
You are prompted to enter your password.
- Type the password in the Password field.
The default password is password. Passwords are case-sensitive.
- Click the Login button.
After the system authenticates you, the System Information screen displays.
- Select Routing > VLAN > VLAN Routing Wizard.
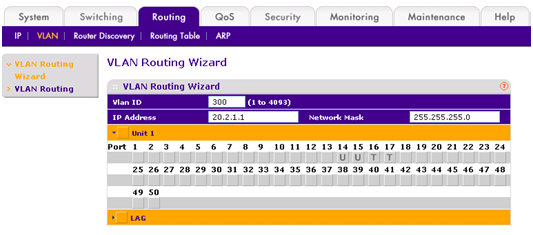
- In the Vlan ID field, specify the VLAN Identifier (VID) for the VLAN.
- In the IP Address field, specify the IP address of the VLAN interface.
- In the Network Mask field, specify the subnet mask of the VLAN interface.
- Click the Unit 1 or LAG orange bar to display the ports or LAGs.
- Under each port or LAG that you want to add as a member to the VLAN, click the check box several times to specify the mode that you want to assign for the port or LAG:
- T. The port or LAG is a tagged member of the VLAN. All frames that are transmitted for the port or LAG are tagged.
- U. The port or LAG is an untagged member of the VLAN. All frames that are transmitted for the port or LAG are untagged.
- Click the Apply button.
The smart switch creates the VLAN interface.
NOTE: If you use the VLAN Routing Wizard to add a port or LAG to a new VLAN interface, the smart switch sets the port VLAN interface (PVID) for the port or LAG automatically to the ID of the new VLAN interface.
Last Updated:07/07/2025
|
Article ID: 24709