

To view and change the properties of a share:
1. Select Shares.
2. Click the Data Set button (with four cubes,  ).
).
The Shares screen displays (see the figure in Step 4).
3. Select the share that you want to explore by clicking it.
The color of the share turns purple.
4. Right-click the share.
A pop-up menu displays:
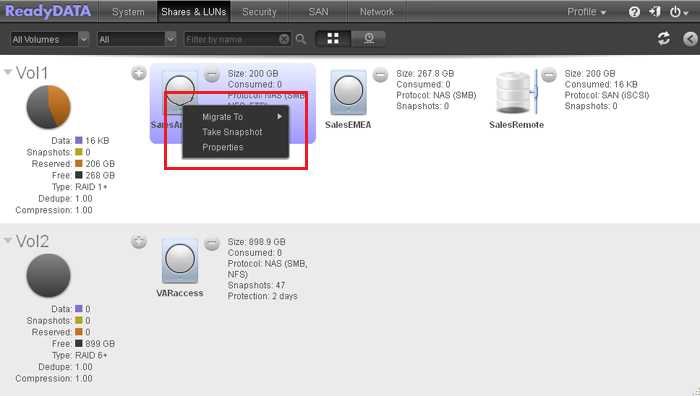
5. Select Properties.
The Properties pane for the selected share displays at the right of the screen (see the next figure). The properties that are displayed in the Access section depend on the selected file-sharing protocol or protocols.
Note: You can also use a shortcut to display the Properties pane of a share. Click the screen Expand button ( ) on the top right of the screen to display the Properties pane (see the red oval on the top right of the previous figure). Click the same button (which now appears as a reversed arrow
  ) again to hide the Properties pane.
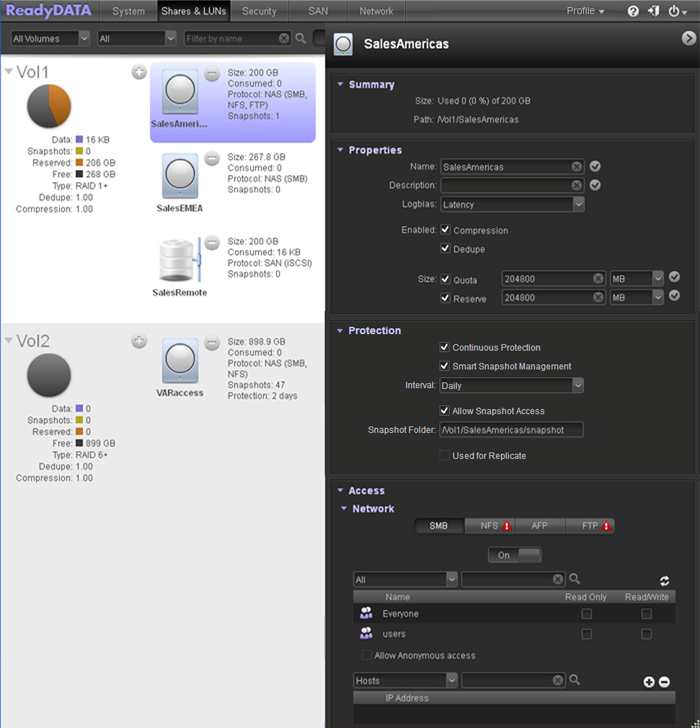
6. Change the settings as explained in the following table. Click the flag button ( ) to save any changes in a field or drop-down list.
|
Item |
Description |
||
|
Summary |
|||
|
Size |
The size is provided for information only. To change the size, see the Size fields in the Properties section of the Properties pane. |
||
|
Path |
The path is provided for information only. |
||
|
Properties |
|||
|
Name |
A unique name to identify the share. Do not include spaces in the name. |
||
|
Description |
An optional description to help identify the share. |
||
|
Logbias |
Change the logbias setting by making a selection from the Logbias drop-down list:
|
||
|
Compresison |
Select the Compression check box to enable data compression. Compression saves storage space and increases the speed of data transfers, but the compression and decompression processes require additional resources. |
||
|
Dedupe |
Select the Dedupe check box to enable deduplication, which prevents storage of redundant data on the share. Unique data is stored only once on the share, and other instances of the identical data are removed and replaced by a pointer to the unique data. This storage method saves storage space and increases the speed of data transfers. |
||
|
Size |
You can increase the quota or reservation of an existing share without affecting or disconnecting any users. Expansion is instant, regardless of the data size. |
||
|
Quota |
Select the Size check box and enter the size of the storage space that is available to the share. |
Select the unit of measurement from the drop-down list:
|
|
|
Reserve |
Select the Reserve check box to reserve guaranteed storage space for the share on the volume. |
||
|
Protection |
|||
|
Continuous Protection |
Select the Continuous Protection check box to enable data protection through snapshots and configure the frequency at which snapshots are made. By default, the Continuous check box is selected. For more information about snapshots, see the What snapshot concepts do I need to know before using my ReadyDATA storage system? |
||
|
Smart Snapshot Management |
Select the Smart Snapshot Management check box to enable automatic snapshot pruning. When enabled, this feature deletes older snapshots so that hourly snapshots are kept for 48 hours, daily snapshots are kept for 4 weeks, weekly snapshots are kept for 8 weeks, and monthly snapshots are kept indefinitely.
|
||
|
|
Interval |
The interval specifies how often a snapshot is made. Make a selection from the drop-down list:
|
|
|
Allow snapshot access |
Select the Allow snapshot access check box to allow snapshot access to anyone who has permission to access the share. The default snapshot access folder displays in the Snapshot folder field.
|
||
|
Access |
|||
|
For information about how to provide share access to users and groups, see the How do I set up the access rights for a share on my ReadyDATA storage system? |
|||
Note: The changes that you make on the Properties pane take effect immediately (that is, no Apply button exists to confirm the changes).