

This describes how to configure a VPN connection between a Windows computer and the FVS114 VPN Firewall. The procedure also applies to the FVS318 and FVS124G VPN Firewalls.
You can use the FVS114's VPN Wizard to create a single policy set (IKE and VPN policies) to allow remote users to connect from mobile locations or locations whose IP addresses are not permanently assigned. These computers may be directly connected to the Internet or they may be behind NAT routers, but we will assume that they are using temporary IP addresses such as would be assigned by typical home or hotel Internet service.
Each computer uses NETGEAR's ProSAFE VPN Client, and since the remote computer's IP address is assumed to be unknown, the computer must always be the connection initiator.
Configuring the FVS114:
- Select the VPN Wizard. The VPN Wizard window appears (shown below).
- Give the client connection a name, such as home.
- Enter a value for the pre-shared key.
- Select a remote VPN client.

- Click Next to go to the summary page.
- Click Done to create the 'home' IKE and VPN policies.
Note: By default, different units use different identifiers, to be able to follow the next steps you will need to go to the IKE policy section and make note of them as you will need those values while configuring the client. They are listed as Local Identifier and Remote Identifier.
Configuring the VPN client:
- Right-click the VPN client icon in the Windows toolbar and select Security Policy Editor.
- In the upper left of the Policy Editor window, click the New Document icon to open a New Connection.
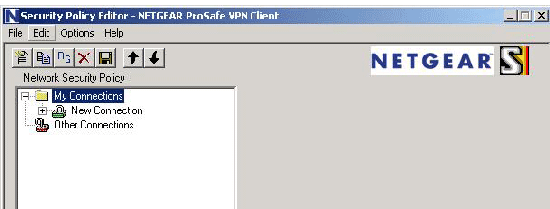
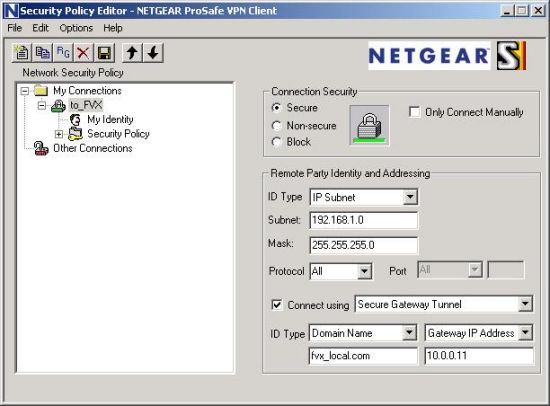
- Give the New Connection a name, such as to_FVX.

- In the Remote Party Identity section, select ID Type of IP Subnet.
- Enter the LAN IP Subnet Address and Subnet Mask of the FVS114's LAN.
- Select Connect using Secure Gateway Tunnel.
- Under ID Type, select Domain Name and also Gateway IP Address.
- For Domain Name, enter the value of the Local Identifier, the value that the wizard assigned while creating the policy on the router, you can find it in the IKE policy section of router's GUI, and enter the WAN IP Address of the FVS114.
- In the left frame, click My Identity.
- Select Certificate = None.
- Under ID Type, select Domain Name.
The value entered under Domain Name will be of the form '<name><number>.<remote identifier>, where each user must use a different variation on the Domain Name entered here. The <name> is the policy name used in the FVS114 configuration. In this example, it is 'home'. The <number> is a number from 1 to 50, chosen for each user. The <remote identifier> is the value that the wizard assigned while creating the policy on the router, you can find it in the IKE policy section of router's GUI. In this example, we have entered home11.fvx_remote.com. - Set Virtual Adapter to Disabled or Preferred. Although your connection will work with Virtual Adapter disabled, if another user behind another NAT router has the same private IP address as yours (for example, 192.168.0.2), your connection could be disrupted. We recommend setting Virtual Adapter to Preferred (not Required), and choosing a private IP address that is not used anywhere in your network for Internal Network IP Address.
- For Internet Interface, select your computer's network adapter. Your current IP address appears.

- Before leaving the My Identity menu, click Pre-Shared Key.
Click Enter Key, type your preshared key, and click OK. This key will be shared by all users of the FVS114 policy "home". - In the left frame, click Security Policy.
-
- Select Phase 1 Negotiation Mode = Aggressive Mode.
- Disable PFS.
- Enable Replay Detection.
- In the left frame, expand Authentication and select Proposal 1.
The settings should be: Pre-Shared Key, Triple DES, SHA-1, Unspecified, D-H Group 2. - In the left frame, expand Key Exchange and select Proposal 1.
The settings should be: Unspecified, None, ESP-Enabled, Triple DES, SHA-1, Tunnel, AH-Disabled. - In the upper left of the window, click the disk icon to save the policy.
Testing your connection:
- Right-click the VPN client icon in the Windows toolbar and select Connect, then My Connectionsto_FVX.
- Within 30 seconds the message "Successfully connected to My Connectionsto_FVX" displays and the VPN client icon in the toolbar reads On.
For status and troubleshooting information, right-click the VPN client icon in the Windows toolbar and select "Connection Monitor" or "Log Viewer", or view the VPN log and status menu in the FVS114.