

This article shows users how to create a backup job that copies data from a Windows XP computer to a ReadyNAS OS 6 storage unit.
Prepare the Network and ReadyNAS Unit
To prepare the Network and ReadyNAS unit:
- Connect the ReadyNAS unit and Windows XP computer to a router and power on all devices.
For more information, see the Appendix Note 1.
- On the Ready NAS unit, click the Shares tab and then click the New Folder button.
In this example, a share called Buyers is created.
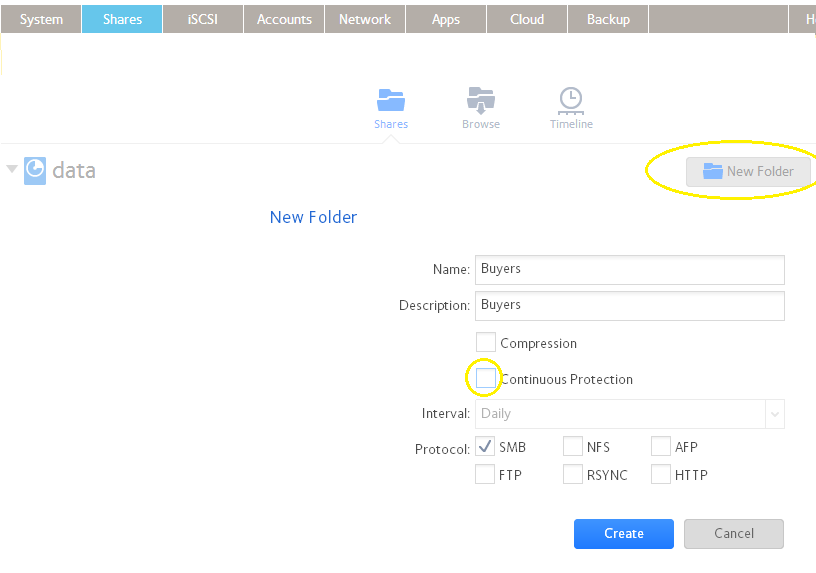
- For simplicity, clear the Continuous Protection check box.
Continuous snapshots are turned off.
- Leave the other Network and File Access settings as default.
Prepare the Windows XP Computer
To prepare the Windows XP computer:
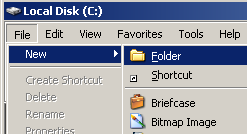
In this example, the new folder Purchasing is created.
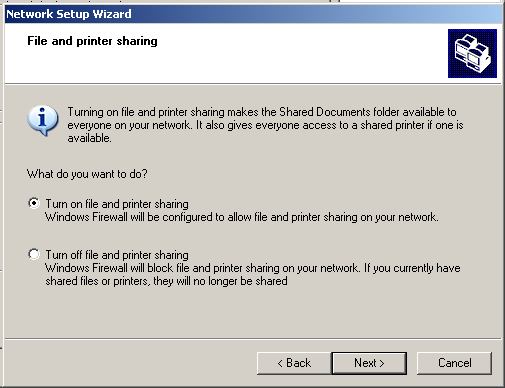
Because the laptop that was used in this example was reimaged, initializing the Network Setup Wizard is required.
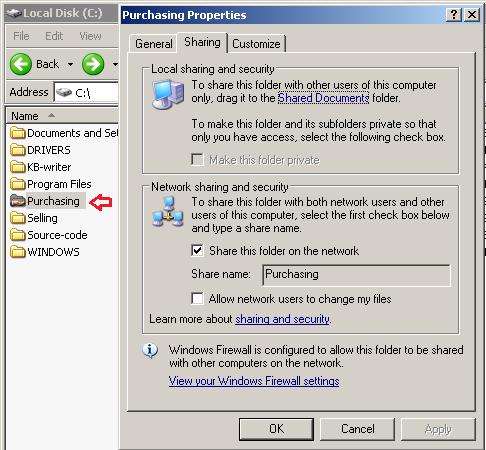
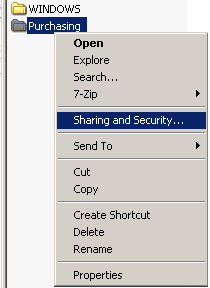
The hand symbol under the Purchasing folder name indicates that the folder can be shared.

- For demonstration pruposes, in Windows Explorer, create a new folder.
- Right-click for Properties.
- Click on Sharing and Security.
- Enable sharing and security for this folder.
- Proceed through the steps. Click the OK button.
- Click the Next button.
- Click the OK button.
- For demonstration use, copy some files to this folder on the Windows XP computer.
Create the Backup Job
To create the backup job:
This examples copies source data from the Purchasing folder on the Windows XP computer to the destination Buyers Share on the ReadyNAS unit.
The Windows Timestamp is picked here, but the Windows Archive bit can also be used.

In this example, select the Buyers share.
On the Destination tab, only two boxes are filled because the ReadyNAS unit is receiving the data.
The source of the data is the Purchasing folder on the Windows XP computer.
The source page is filled as follows:
In this example, 192.168.1.2 is the IP address of the Windows XP computer. For more information on how to obtain the IP adress, see Appendix Note 2.
No forward (/) or back (\) slashes are inserted in this example.Since in this example, because the Windows login prompt asking for the user name and password was not set up, these fields are left blank. This situation is different across customer sites, but most home users will not have logins. Business users in a workgroup or domain will have logins.


An instant response indicates whether the remote ReadyNAS unit and folder can be accessed.
If needed, check the user name and password.
In this example, the backup job runs after 8 pm on weekday nights.

- On the ReadyNAS unit, click the Backup tab and then the Add Backup button.
- From the destination list, select the destination share on the ReadyNAS unit.
- Click the OK button.
- To test the connection, click the OK button and then click the Test Connection button.
- If this test fails, check the IP address settings. Then check the folder name, which is case sensitive.
- Set the schedule according to personal and business needs.
Run the Backup Job
To run the backup job:
The created jobs display.

The status bar indicates either Queueing, In-process, Completed, or Failed.

See Appendix Note 4 also.

- On the ReadyNAS unit, select Backups >> Jobs.
- Left-click on the backup tab and click the Start button.
- To confirm the data copy, click on the Browse button and then click on the folder name.
Appendix
Note 1. Equipment Setup
The photo shows a home router, a Windows XP laptop computer, and a RN104 ReadyNAS unit.

The cable colors indicate the following connections:
- Navy cable. The Internet connection to the router WAN port.
- Yellow cable. The router connection to the Windows XP computer.
- Green cable. The router connection to the RN104 ReadyNAS unit.
Note 2 : How to Determine the IP Address of a Windows XP Computer
To determine the IP address of a Windows XP computer:
You might need to search for Command Prompt, or CMD for short. Here the command prompt is pinned to the Start menu.


Note 3. Use a Static IP Address for the Windows XP Computer
For backup jobs that occur regularly, NETGEAR recommends that the Windows XP computer use a static IP address. If this computer is regularly leased by DHCP, the 192.168.xx.yy IP address might vary and the backup job does not run. The settings on your router usually allow you to reserve a fixed IP address.
Note 4. Network Performance Graph
The network performance graph provides an indication of the data flow and backup duration.

Note 5: Microsoft Management Console
Windows XP Help points to the Microsoft Management console. This console is not needed for file sharing.

- Click the Start button.
- Open the command prompt.
- Type ipconfig.