

M6100 Firmware Version 11.0.0.25 Release Notes
Applicable Models
- M6100
- XCM8903
- XCM8944
- XCM8948
- XCM8944F
- XCM8924X
- XCM89P
- XCM89UP
Bug Fixes since 11.0.0.18
- Unknown BGP packets locked up the switch and required hard reboot to start passing traffic again.
- SFP ports are not coming up after reboot.
- There are some garbage u/s/p value in PoE log messages.
- TechSupport file corrupted after upload it through GUI.
- The port does not link up after connect XCM8924X to GS752TPS.
- The switch is not using the configured radius source interface while sending the radius packets.
- It is unable to disable LACP mode on ports on the page of Switching>Ports>Port Configuration.
- The password for RADIUS account server changed after rename the RADIUS account server's name through GUI.
- Random ports transition into invalid state in specific scenario.
- OSPFV3 Stack Master reboots when it is configured as ASBR in specific scenario.
- mDNS packets will be dropped when IGMP/MLD snooping is enabled.
- A lot of entries missing in the Neighbor Table on IPv6 GUI.
- M6100 upgraded the 10G phy to v1.09.1.
- Switch sends radius accounting requests with default interface IP instead of user configured radius source interface IP.
- Fan speed is incorrect with latest FPGA on M6100.
Download
Using the Download Link below, download and extract the new firmware to a convenient place such as your desktop.The filename after extracting is m6100v11.0.0.25.stk.
Download Link: http://www.downloads.netgear.com/files/GDC/M6100/M6100_V11.0.0.25.zip
Changes and Restrictions
- If the network is configured as DHCP mode on the previous version, after it upgrades to 11.0, the "network" interface protocol mode will change to "none," its IP will be set to "0.0.0.0" and DHCP mode is enabled on management VLAN instead.
- The auto install is not allowed to apply a config file if the startup-config file contain the commands related to the "network" interface which is not supported on 11.0.
- If user configures the ports as protected port, routing mode is not allowed to configure on the VLAN in which those protected port are added.
Upgrade Procedure
-
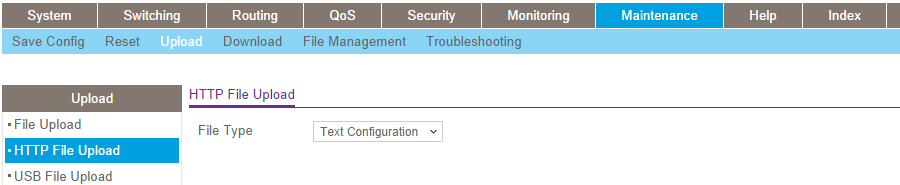
Save the current configuration data. Normally, the firmware will preserve the original configuration in the switch. However, because this is a major firmware upgrade, you may want to save a copy of current running configuration, just in case something goes wrong during the upgrade. To do so, go to "Maintenance -> Upload" page, and select Text Configuration option and click the Apply button to save the configuration file.
-
Download the new firmware from the NETGEAR product support page and store it in a PC, and remember its location in the PC’s file system.
-
There are two ways to download the new firmware from PC to the switch:
-
One is using TFTP which requires a TFTP server be installed on the PC where the firmware is stored from step #2. If you preferred to use TFTP method, or you're using telnet session to perform firmware upgrade, continue to step #5.
-
The second method is to use web browser for downloading which requires of no TFTP server. Continue to the next step to use HTTP file download.
-
-
To use HTTP method, go to the following web GUI page (Maintenance -> Download -> HTTP File Download), select the location of the new firmware via the Choose File button, and click the Apply button to start firmware upgrade. The upgrade will take about 12 minutes. Do not power cycle the switch before the process is complete.
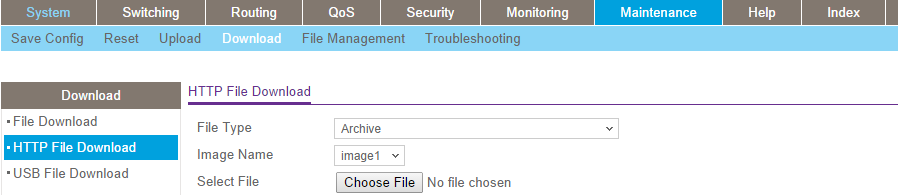
After the Apply button is clicked, the file transfer will start, and followed by writing the new image to the Flash memory. Do not power cycle or reboot the switch before the process is complete, and the success message will show up as below.
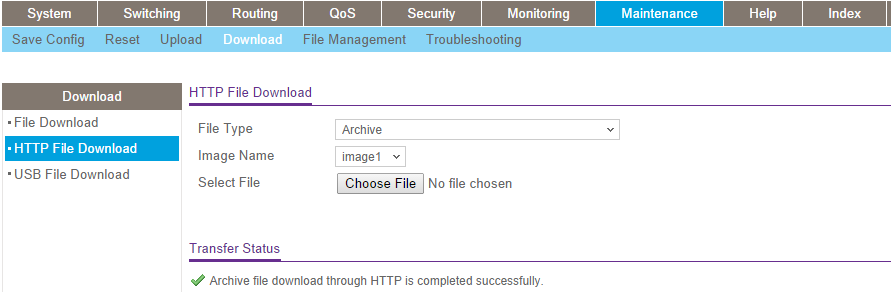
After the successful completion the upgrade, proceed to step #8 to restart the switch. -
To use the TFTP method, start a TFTP server on the PC where the new images are stored. If you do not have a TFTP server, we recommend using free tools such as PumpKIN or TFTPD32.
-
You can use either web interface or CLI interface to perform upgrade using TFTP. To use web interface, go to "Maintenance -> Download -> File Download," select Transfer Mode as TFTP, complete the text fields on the page and hit Apply to start. To use CLI, either telnet into the switch or use console port and follow these steps below.
-
On the switch console, type the following command:
a. # copy tftp://<tftp server IP address>/<image name> system:image
b. It will ask for confirm with input data displayed. Hit enter if all parameters look correct.
c. The download should take a minute or two. After that, the code will be checked for possible corruption, if not, it will report firmware successfully upgraded.
d. Reboot the switch by typing "reload" command or power cycle the switch. -
To use GUI to restart the switch, go to web page "Maintenance -> Reset" page, Device Reboot table.
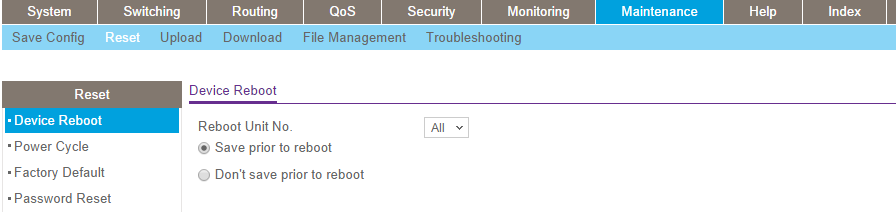
Make sure that "All" is selected in "Reboot Unit No" drop down menu box. If it is shown with some other value like "1", then only unit 1 in the stack will be rebooted, and this may result in stack failure after the stack is rebooted. You may select "Save prior to reboot" option if you feel there are changes that may not have being saved. Click the Apply button to start the reboot process. -
After the switch is restarted, type the following CLI command to verify the version is correct.
a. # show hardware
b. Or, go to GUI System main page (System -> Management -> System Information, under Device Status) to confirm the switch firmware is the one downloaded. -
Verify the switch running configuration by issuing "show running-config" command. The output should match the configuration file saved on step #1. If they are not, please call NETGEAR customer support on discrepancy and manually reapply the missing configuration commands back to the switch.
-
You can now make additional configuration changes for other applications, and be sure to use "save" command to save the configuration after you're done.