

This article outlines methods of installing an access point into your network.
Configuring the access point for connection into the network using a static IP address:
Each LAN operates on an IP subnet with each LAN device assigned a unique IP address which helps identify the devices on the network and allows communication to take place between devices. When installing an access point into a network it is necessary to confgure the access point with an IP address to match the same IP subnet in operation in that network. The following steps outline how to find the IP subnet in your network and how to access the web interface of the access point and set the correct IP address on the access point.
1. Make a note of the existing IP address range that is used on the LAN. This can be done from a Windows PC which is currently working on the LAN.
Open a command prompt, Click Start > type CMD.
In CMD type ipconfig /all and hit enter.
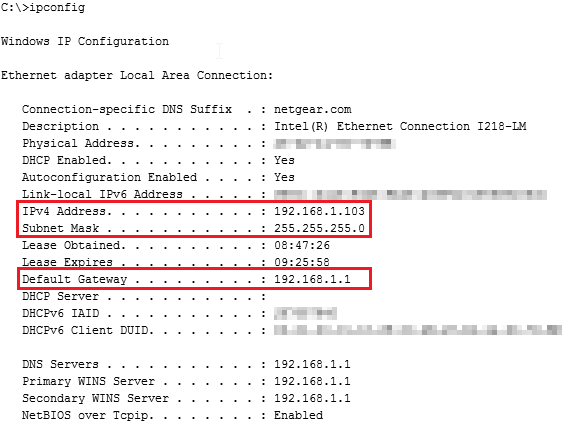
In this example the existing IP subnet is 192.168.1.0/24, a host IP address in the range of 192.168.1.2 through to 192.168.1.254 will allow a host access to the network.
The network subnet in your network can be different, the values used here are just for example and will not work in every network.
2. Take an Ethernet cable (an Ethernet cable is provided in all ProSAFE access point packaging) and connect it directly from the Network Interface Card (NIC) of your PC into the Ethernet port on your access point.
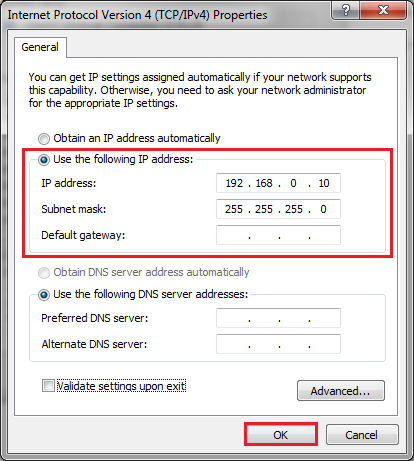
3. Change the IP address on the PC to match the default IP subnet of the access point. All ProSAFE access points have a default IP subnet of 192.168.0.X.
In Windows open Conrol Panel > Network and Sharing Center. Click Change adapter settings.
Right click on the connected NIC and click Properties.

Select Internet Protocol Version 4 (TCP/IPv4) > click Properties.

NOTE: make a note of the existing setting you see here, as you will need to re-apply these settings later.
Select Use the following IP address > Enter an IP address in the range of 192.168.0.2 to 192.168.0.254 > click Ok twice.
Now in your browser enter the URL http://AP_IP_address/ - where AP_IP_address is the default IP Address for your AP. To find the default IP address of your AP please refer to the Default IP address table. The default IP address is also printed on the sticker underneath your access point.
You are prompted to login to the Admin page. The default login credentials for all ProSAFE access points;
user: admin
password: password
4. Go to Configuration > IP > IP settings.
NOTE: Depending on the version of firmware your AP is running will determin if the DHCP client function is set to Enable or Disable. For now you can set it to Disable and proceed to set a static IP address on your access point. This static IP address will be unique to this access point in your network, and will be the IP address used to configure the access point thereafter.
The IP you set must be within the same IP subnet currently running in your network, refer back to point 1 to see what IP subnet is running in your network.

For WAC720 and WAC730 the IP settings are set in Configuration > System > IP Settings.

Note: The IP address settings used in the sample screenshots are just for illustration purposes and may not be correct for your network.
5. Once you have set and applied an IP address on the access point you can proceed to physically connect the access point into your LAN.
In order for your PC to work on the LAN please repeat Step 3, however set the IP address accordingly to match the existing LAN subnet in use.
Connecting the access point into the network as a DHCP client:
On some ProSAFE access points we have enabled the DHCP client function as the default setting, this is only available on the latest firmware. In the past all ProSAFE access point models had DHCP client disabled and each access point had a default IP address depending on the model. If that default IP address was not in the same IP subnet operating on your LAN it was required to connect to the access point with a PC and manually configure the IP address on the access point so it could communicate in your LAN, as seen above.
NOTE: Please see the Default IP address for reference to the default IP address of each model access point, and the firmware version where DHCP client enabled was introduced.
With DHCP client enabled it allows for easier installation into the network. DHCP client on a ProSAFE access point works just like it does on a PC, when connecting the access point into the network using an Ethernet cable it will request an IP address from a DHCP server, the DHCP server will assign an IP address to the access point within the IP subnet range of the LAN and the access point will be able to communicate on the network.
While this does allow for easier initial installation, it is necessary to check the DHCP server to find out which IP address is assigned to the access point in order to access the access point web interface and proceed to configuring the wireless settings, security settings etc. A DHCP server on a network can be provided by many different devices, typically we see it being provided by the cable/DSL router, Windows server or Linux server or even a Managed switch.
If you are familiar with the DHCP server in your network you may wish to pre-configre an IP reservation for your access point to further control the IP address that is assigned by the DHCP server.
Where to install the access point in the Local Area Network:
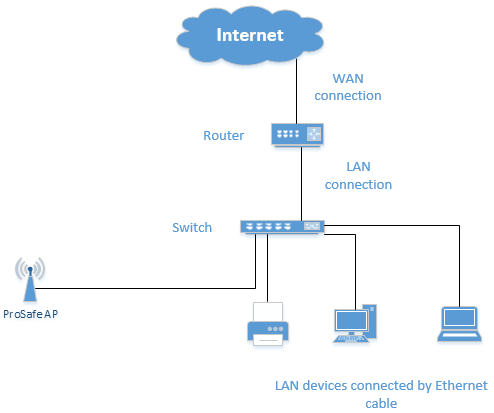
In all Home or Small Office networks access to the Internet is provided by a router, a router consists of a WAN connection and also a LAN connection. The WAN connection is the connection to the Internet provided by an Internet Service Provider (ISP) and is generally provided in the form of a cable connection from a cable modem, a DSL connection via a modem connected to a phone line, or even a 3G/4G connection using a SIM card.
The local area network (LAN) portion of your router will generally be in the form of 4 or more Ethernet ports and consists of devices all operating within your private network interconnecting via either Ethernet cables or wirelessly to form the LAN. LAN devices are your PC's, servers, printers, switches, access points, wireless clients (i.e. tablet, smartphone, games console) and generally all access the Internet through the WAN connection of your router.
Even though your access point is used to provide a wireless connection to your wireless devices, the access point itself must connect into the network with an Ethernet cable. When physically installing the access point ensure it is connecting into the LAN side of your network, this may be via a network switch, a powerline network device or even directly into your router.
The following diagram is an example of a small network and its purpose is to illustrate that the access point is to be connected by Ethernet cable into the LAN connection of your router. Of course all home or small office networks will be different and the amount of LAN devices will vary.
Accessing the access point web interface after installation:
Whether your access point is installaed by setting a static IP address or it receives an IP address from a DHCP server, it is necessary to know the access points IP address to access the web interface. To access the web interface open a browser and enter http://AP_IP_address/
The default login credentials for all ProSAFE access points;
user: admin
password: password
NOTE: Current ProSAFE branded Access Points that are compatible with Business Central 2.0 Wireless Manager include ProSAFE WNAP210v2, WNDAP320, WNDAP350, WNDAP360, WNDAP660, WAC720, and WAC730.
Business Central is our cloud based access point management tool, allowing administrators to manage multiple access points in multiple locations, all from the cloud. On compatible access points cloud mode is enabled by default when running the cloud supported firmware 3.x.x.x.
If you do not intend to use your access point with Business Central it is recommended to disable the cloud mode. Please disble cloud mode before you begin to configure your access point settings as Enable/Disable cloud mode option resets the AP to factory default and will only retain IP address, DNS and management VLAN settings.
Cloud mode is found in the web interface on the Configuration - System - Basic - General page. It is named as either Business Central Enabled or Cloud Enabled depending on the model access point.
For further recommendations on best practices for the placement of your access point, please check out this guide
| Model | Default IP address | DHCP client enabled since firmware |
|---|---|---|
| WAC120 | 192.168.0.100 | v2.0.7 |
| WAC720 | 192.168.0.100 | v3.5.12.0 |
| WAC730 | 192.168.0.100 | v3.5.12.0 |
| WN370 | 192.168.0.160 | N/A |
| WN604 | 192.168.0.100 | N/A |
| WNAP210v2 | 192.168.0.236 | fw 3.5.6.0 |
| WNAP320 | 192.168.0.100 | fw 3.5.6.0 |
| WND930 | 192.168.0.100 | v2.0.11 |
| WNDAP350 | 192.168.0.237 | fw 3.5.6.0 |
| WNDAP360 | 192.168.0.100 | fw 3.5.6.0 |
| WNDAP620 | 192.168.0.100 | N/A |
| WNDAP660 | 192.168.0.100 | fw 3.5.6.0 |