

You can configure a guest portal or captive portal with a local or external authentication server.
»To configure a guest portal or a captive portal:
- Open a web browser. In the browser’s address field, type the http:// followed by the IP address that you assigned to the wireless controller.
By default, the IP address is 192.168.0.250. If you have not yet assigned another IP address to the wireless controller, type http://192.168.0.250.
The wireless controller’s login screen displays. - Enter your user name and password.
If you have not yet personalized your user name and password, enter admin for the user name and password for the password, both in lowercase letters. - Click the Login button.
The wireless controller’s web management interface opens and displays the Summary screen - Select Configuration > Captive Portal.
The Portal Settings screen displays. The following figure shows the settings for a captive portal. The settings for a guest portal are identical, except for the RADIUS server settings, which you cannot configure for a guest portal.
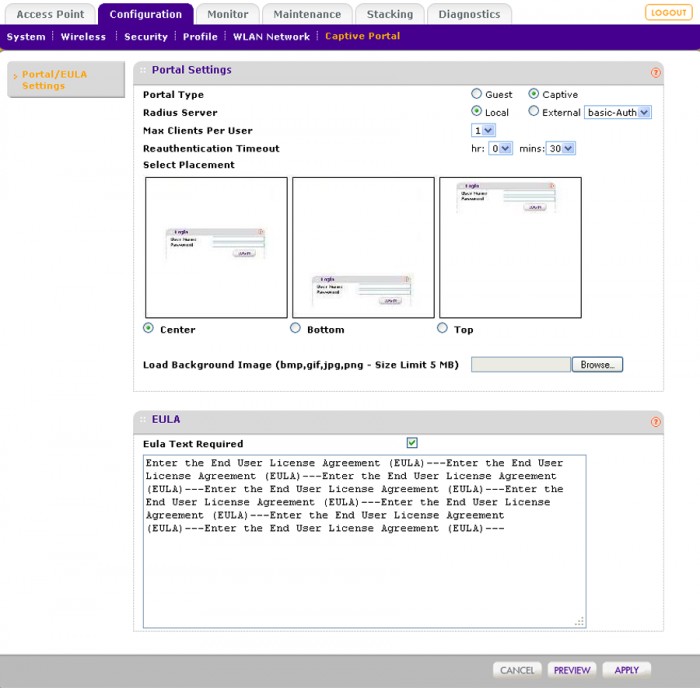
- Configure the settings as described in the following table.
Setting Description Portal Settings section Portal Type Select one of the following radio buttons:
- Guest. A guest portal with a field for entering an email address. Guests do not need to provide a password and can have unlimited access to the network. You do not need to configure guest accounts.
- Captive. A captive portal with a field for entering a login user name and a field for entering a password.
If you select this option, the Radius Server radio buttons and menu display.
Radius Server
Note: This setting is for a captive portal only.Select one of the following radio buttons:
- Local. Use the local authentication server.
- External. Select an external authentication server from the drop-down list.
Note: For information about setting up and enabling internal and external
authentication servers, see How do I specify the type of authentication server and what are the authentication server concepts for my ProSAFE Wireless Controller WC7600?Max Clients Per User Specify the number of clients that a single captive portal user can open with the same the login information.
The default setting is 1. The maximum number of clients that you can select from the menu is 5.Re-authentication Timeout Specify the period after which a user who has been idle must be re-authenticated.
The minimum period is 30 minutes. The maximum period that you can select is through the menus is three hours.Select Placement Click the Center, Bottom, or Top button to specify the location of the login prompt on the login screen. Load Background Image (Optional) Click the Browse button to navigate to and select an image file for the background of the login screen. You can use a .gif, .,jpg, or .bmp image. EULA section EULA Text Required Select the EULA Text Required check box if you want to present the end-user license agreement (EULA) on the guest login screen or captive portal login screen so users can view the EULA before they log in. Enter the EULA text in the text field. - (Optional) Click the Preview button.
The portal settings that you have configured display. The default URL for the captive portal is http://192.168.0.250/guest_access/index.php. - Click the Apply button.
- Assign the captive portal or guest portal to a security profile in the basic profile group, in an advanced profile group, or in both:
- Basic profile group. Assign the captive portal or guest portal to a security profile in the basic profile group:
a. Select Configuration > Profile > Basic > Radio.
The Edit Profile (Basic) screen displays.
b. Click the tab for the radio for which you want to assign the portal.
c. Click the tab for the profile to which you want to assign the portal.
d. In the Authentication Settings section of the screen, select the Captive Portal check box.
The Captive Portal check box displays only when you select Open System,
Shared Key, WPA-PSK, WPA2-PSK, or WPA-PSK & WPA2-PSK from the
Network Authentication menu.
e. Click the Apply button. - Advanced profile group. Assign the captive portal or guest portal to a security profile in an advanced profile group:
a. Select Configuration > Profile > Advanced > Radio.
The Profile Groups screen displays.
b. Click the tab for the profile group for which you want to assign the portal.
c. Click the Edit button.
The Edit Profile screen displays.
d. Click the tab for the radio for which you want to assign the portal.
e. Click the tab for the profile to which you want to assign the portal.
f. In the Authentication Settings section of the screen, select the Captive Portal check box.
The Captive Portal check box displays only when you select Open System,
Shared Key, WPA-PSK, WPA2-PSK, or WPA-PSK & WPA2-PSK from the
Network Authentication menu.
g. Click the Apply button.
Last Updated:10/17/2025
|
Article ID: 25678