

Some firmware upgrades require the switch to update the boot code or that some fixes require the boot code to be updated. This guide is for updating the boot code update through TFTP and not through HTTP. To do that, follow the steps below:
1. Download or get the boot code. Normally the boot code comes with the firmware when you download it.
2. Install a TFTP application. Here we will be using TFTD32.
3. Once installed, open TFTPD32.
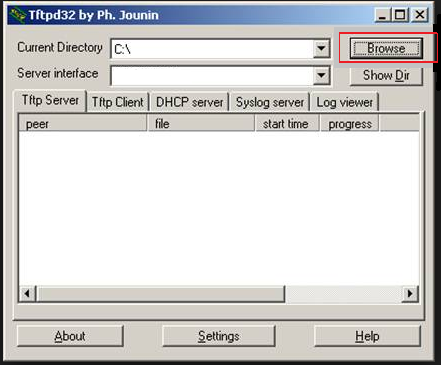
4. Click Browse then select the folder location of the boot code. In this example, I placed the boot code in the C:\.
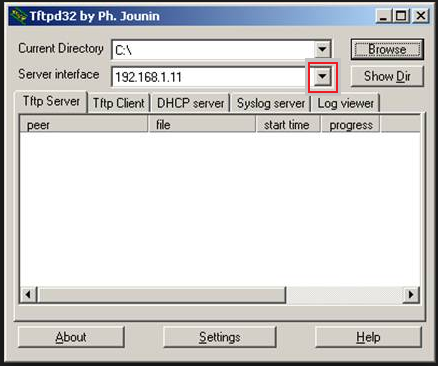
5. Click the dropdown for the Server Interface and select the IP address of that computer. In this example, the computer's IP address is 192.168.1.11.
Note: Do not forget to turn off the computer's firewall for the meantime. The switch will not be able to reach the TFTP server if firewall is on.
6. Login to the switch and go to Maintenance > Download then select TFTP File Download.
7. Complete the following details:
- File Type is Boot
- Server Address is IPv4
- TFTP Server IP is the IP address of the PC – in the example 192.168.1.11, and will show in the Server Interface section as shown.
- Transfer File Path - (leave it blank - do not put anything here, however this implies, in the example above, that the file is located at C:\ )
- Remote File Name is the complete name of the boot code file (example: ng_gs728_52tp_516tp_boot-20011.rfb)
- Start File Transfer should be checked.
8. Click on Apply.
Note : The boot code update will take about a minute. Do not navigate through other webpages just to be safe, and to ensure that the update will not be interrupted. You can see the progress of transfer underneath the “Start File Transfer” section.

8. Once the transfer is completed, reboot the system manually. Best to unplug the power then replug after 10 seconds.
Note: It may take up to 8 minutes, or more, before the switch completes the boot process after updating the boot code. This is normal. Do not reboot or turn off the switch unless the first boot is completed.