

You can use the boot menu to restart or troubleshoot your ReadyNAS storage system.
Your storage system has the following boot modes:
- Factory reset.
WARNING: The factory reset reboot process resets the system to factory settings, erases all data, and resets all defaults.
Performs a short disk test and then allows you to reset your system to the factory defaults or switch between X-RAID and Flex-RAID. The system performs the disk test, which takes about five minutes, waits 10 minutes, and then restores the system to its factory settings. During the 10-minute window, you can shut down the system to avoid erasing its settings and files, or you can use RAIDar to format the system’s disks as Flex-RAID instead of X-RAID. If you do not shut down the system or use RAIDar, the system is reset to factory settings, all files on the system are erased, and the disks are formatted using the same disk configuration that was previously used. (For more information about X-RAID and Flex-RAID, see the ReadyNAS RAIDiator 4.1 Software Manual, which is available at http://downloadcenter.netgear.com/en/product/ReadyNAS Duo [V1].) - OS reinstall. Reinstalls the firmware from the system’s internal flash to its disks. The OS reinstall boot mode can be useful when the system crashes and corrupts some configuration files. OS reinstall boot mode also resets some settings on your system, such as Internet protocol settings and the administrator password, to defaults.
- Tech support.
WARNING: Use the tech support boot mode only when instructed to do so by a NETGEAR Technical Support representative.
Boots into a low-level diagnostic mode. - Skip volume check.
WARNING: Use the skip volume check boot mode only when instructed to do so by a NETGEAR Technical Support representative. Otherwise, you might lose data.
Bypasses file system checks. After a system crash, the system tries to scan and fix the volume using a file system check. If several problems are found on a disk, this process can stall, causing the system not to boot. Use this option to skip the scan and let the system boot. - Memory test. Performs a memory test. The pass or fail result is reported using the system’s LEDs. Contact a NETGEAR technical support representative to interpret memory test results.
- TFTP boot.
WARNING: Use the TFTP boot mode only when instructed to do so by a NETGEAR Technical Support representative.
Replaces the firmware on your system with an image from your computer. - USB boot.
WARNING: Use the USB boot mode only when instructed to do so by a NETGEAR Technical Support representative.
Replaces the firmware on your system with an image from a USB flash drive connected to the system.
To perform an OS reinstall or factory reset:
- Power off your system.
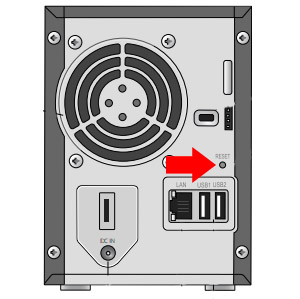
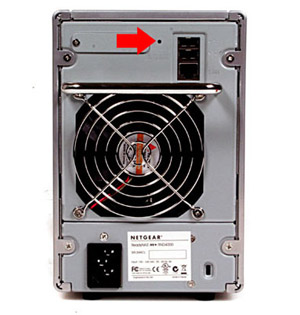
- Locate the Reset button:
- ReadyNAS X6 or 600: the pinhole is on the back in the lower left corner.
- ReadyNAS Duo v1, NV, or NV+ v1: the pinhole is next to the USB port in the back:
Duo v1:
NV+ v1:
- Using a straightened paper clip, press and hold the Reset button.
- While continuing to hold the Reset button, press and release the Power button to power on the system.
- To perform an OS reinstall, continue to hold the Reset button until all Disk LEDs flash once, after about 5 seconds, and then release the button.
To perform a factory reset, continue to hold the Reset button until all Disk LEDs flash twice (once at 5 seconds and then 25 seconds later), and then release the button.
To perform a skip volume check, tech support mode boot, memory test, TFTP boot, or USB boot:
- Power off your system.
- Press and hold the Power button until all Disk LEDs flash the correct number of times, and then release the button. Check the table below for reference.
Systems with an LCD (NV+ v1) also display the boot menu item text on the LCD at each stage.
Boot Menu Mode Action to select Skip volume check Press the Power button and continue to hold it for 5 seconds. Release after all Disk LEDs flash 1 time. TFTP boot Press the Power button and continue to hold it for 10 seconds. Release after all Disk LEDs flash 2 times. Tech support mode Press the Power button and continue to hold it for 15 seconds. Release after all Disk LEDs flash 3 times. USB boot Press the Power button and continue to hold it for 20 seconds. Release after all Disk LEDs flash 4 times. Memory test Press the Power button and continue to hold it for 25 seconds. Release after all Disk LEDs flash 5 times.
For example, to perform a skip volume check, press and hold the Power button until all Disk LEDs flash once, after 5 seconds. To perform a TFTP boot, press and hold the Power button until all Disk LEDs flash twice, once after 5 seconds and then 5 seconds later.
Last Updated:07/07/2025
|
Article ID: 24874