

For information about management access control, see the “What is management access control on a smart switch
To create an access profile and configure a management ACL that permits management access:
- Open a web browser.
- In the browser address field, type the IP address of the smart switch.
The default IP address is 192.168.0.239 and the default subnet mask is 255.255.255.0.
You are prompted to enter your password.
- Type the password in the Password field.
The default password is password. Passwords are case-sensitive.
- Click the Login button.
After the system authenticates you, the System Information screen displays.
- Select Security>Access>Access Control > Access Profile Configuration.
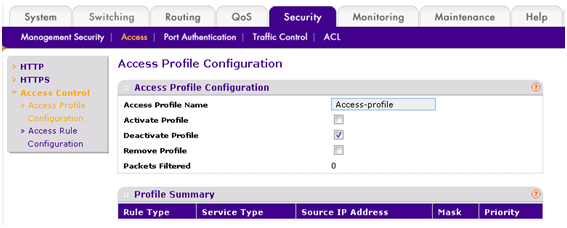
- In the Access Profile Name field, enter a name for the access profile.
The maximum length for the name is 15 characters.
By default, the Deactivate Profile check box is selected. Leave it selected.
- Click the Apply button.
The new profile is saved.
- Select Security > Access> Access Control > Access Rule Configuration.
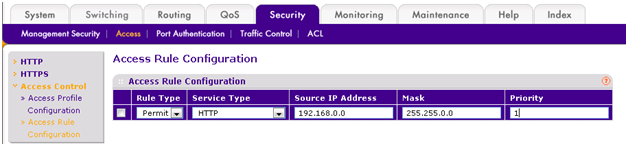
- In the table, specify the following settings:
- Rule Type. From the menu, select Permit.
This setting allows access to the web management interface for traffic that meets the criteria that you configure for the rule. The smart switch denies access to any traffic that does not meet the criteria that you configure for the rule.
- Service Type. From the menu, select the type of service (protocol) that is allowed or prohibited from accessing the web management interface:
- HTTP. The rule applies to the web management interface only.
- SNMP. The rule applies to the SNMP interface only.
- SSL. The rule applies to SSL traffic only.
- Source IP Address. Specify the IP address of the client from which the management traffic originates.
- Mask. Specify the subnet mask of the client from which the management traffic originates. The subnet mask is a standard subnet mask, and not an inverse (wildcard) mask such as the one that you can use with IP ACLs.
- Priority. Specify the priority of the rule. Enter a value in the range from 1 to 20. The rules are validated against the incoming management requests in the ascending order of their priorities. If a rule matches, the smart switch performs the configured action and ignores subsequent rules with a lower priority (that is, with a higher number). For example, if you configure source IP address 10.10.10.10 with priority 1 to permit access, and you configure source IP address 10.10.10.10 with priority 2 to deny access, the smart switch permits access and ignores the second rule.
- Click the Add button.
The settings are saved and the rule is added to the Access Rule Configuration table. However, the management ACL is not yet activated.
- Select Security > Access> Access Control > Access Profile Configuration.
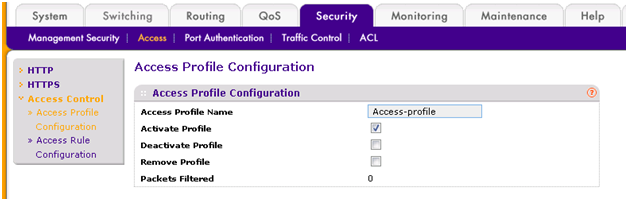
- Select the Activate Profile check box.
- Click the Apply button.
The management ACL is now active.