

Objective: To show how to configure a Mac OS X VPN client, to work with a NETGEAR FVS336Gv2 router. The VPN configuration on the FVS336Gv2 is valid for all the ProSAFE VPN Firewall/Routers, and they can be setup using the same instructions as shown here.
The free VPN client IP Securitas will be used here. http://www.lobotomo.com/products/IPSecuritas/
Contents:
- Introduction to VPN:
- Network Setup
- VPN Setup
- Create VPN policy on ProSAFE VPN
- Firewall/RouterCreate VPN policy on Mac OS X
Introduction to VPN:
A virtual private network (VPN), is a network that primarily uses public telecommunication infrastructure, such as the Internet, to provide remote offices or travelling users, access to a central organizational network.
VPNs typically require remote users of the network to be authenticated, and often secure data with encryption technologies to prevent disclosure of private information to unauthorized parties..
VPNs may serve any network functionality that is found on any network, such as sharing of data and access to network resources, printers, databases, websites, etc. A VPN user typically experiences the central network in a manner that is identical to being connected directly to the central network. VPN technology via the public Internet has replaced the need to requisition and maintain expensive dedicated leased-line telecommunication circuits, once typical in wide-area network installations.
Network Setup:
FVS336Gv2
- WAN IP: 86.47.128.121
- LAN IP: 192.168.1.1
- LAN Subnet Mask: 255.255.255.0
Overview:
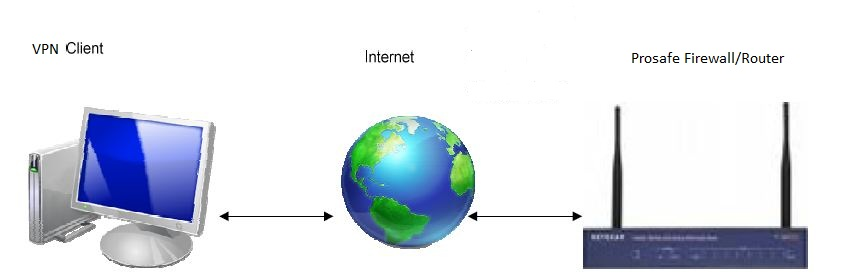
VPN Scenario:
Create VPN policy on ProSAFE VPN Firewall/Router
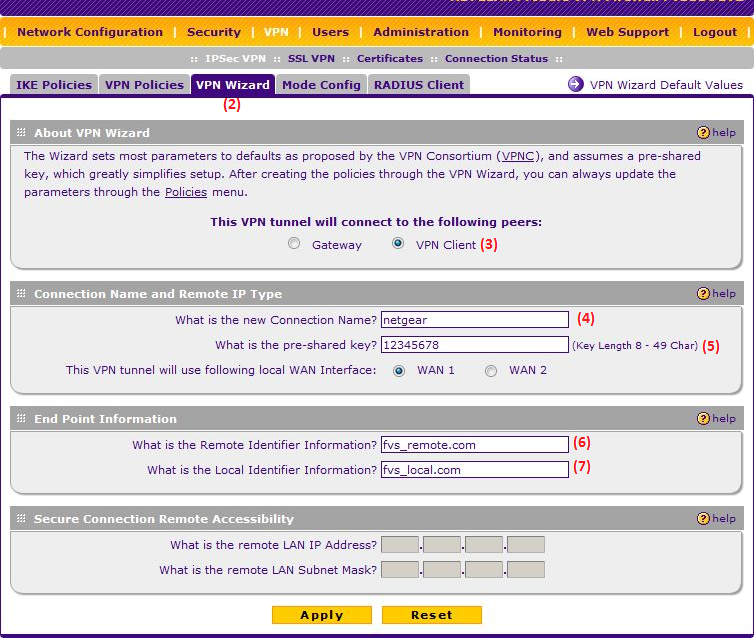
- Log into the router.
- Click on VPN > IPSec VPN > VPN Wizard.
- Select “VPN Client” under “This VPN tunnel will connect to the following peers:”
- Enter in a connection name. This is a piece of text to identify the policy locally.
- Enter the pre-shared key you want to use.
- Enter the Remote Identifier (this will be how the router of VPN gateway identifies your VPN client).
- Enter the Local Identifier (this will be how the VPN client identifies the VPN gateway). The example uses the default (fvs_remote.com ) and (fvs_local.com ) identifiers. This can be any piece of text for example ( England 456 ) & ( France 234 ).
- Click on “Apply”.
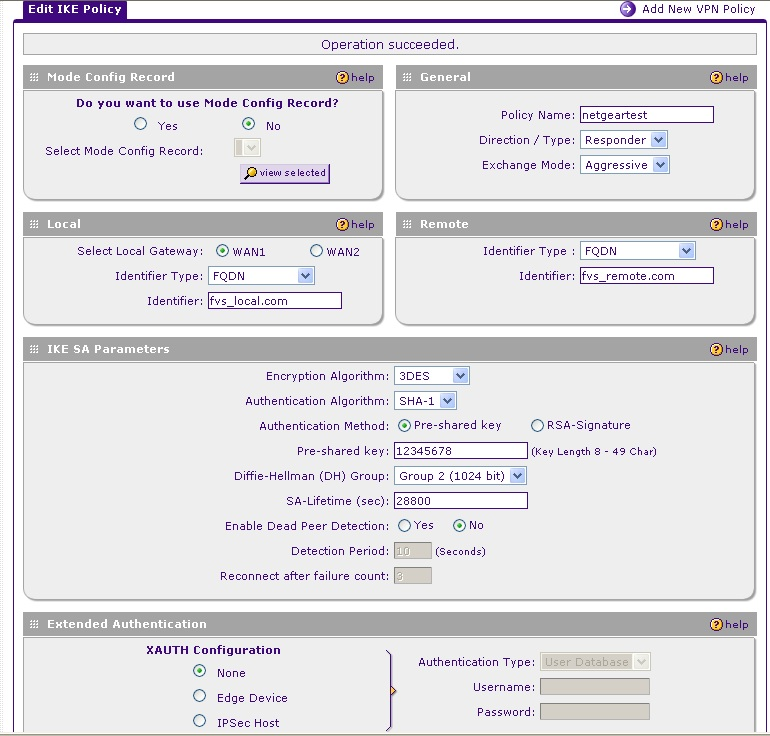
Your IKE policy should look like this:
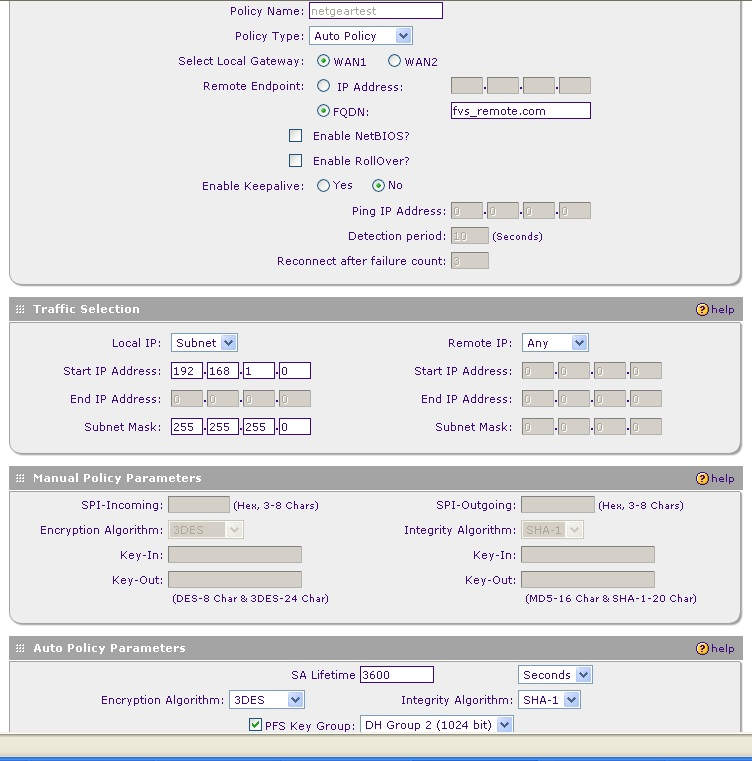
Your VPN policy should look like this:
Create VPN policy on Mac OS X
- Download and install the VPN client from http://www.lobotomo.com/products/IPSecuritas/
- Once installed, go to “Connections” and configure the VPN client to your VPN specifications.
Configuring the Connections:
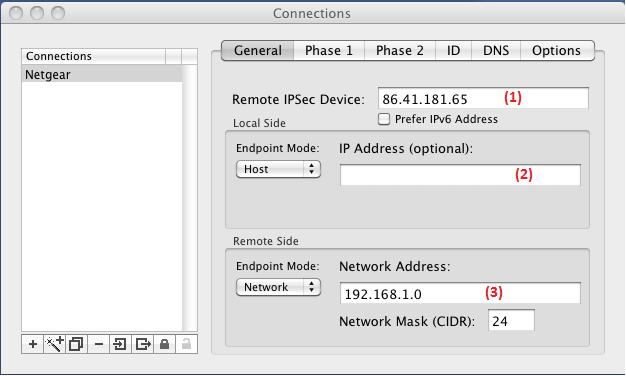
General Tab
- Enter the public IP address for your ProSAFE VPN Firewall/Router.
- Leave the Local Side IP Address blank.
- Enter the Network Address for the LAN side of the ProSAFE VPN Firewall/Router.
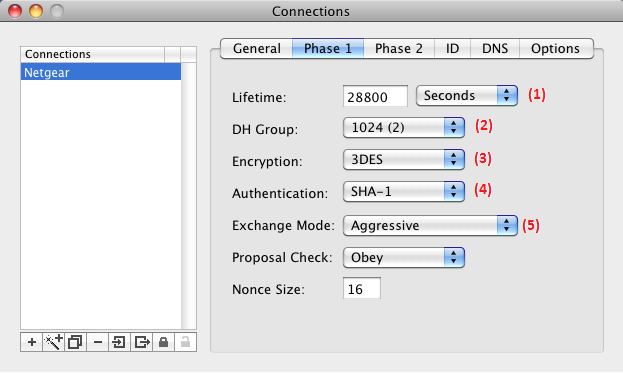
Phase 1 Tab
- Set the Lifetime to match the SA lifetime in your IKE policy.
- Set the DH Group to match the Diffie-Hellman Group in your IKE policy.
- Set the Encryption to match the Encryption Algorithm in your IKE policy.
- Set the Authentication to match the Authentication Algorithm in your IKE policy.
- Set the Exchange Mode to match the Exchange Mode in your IKE policy.
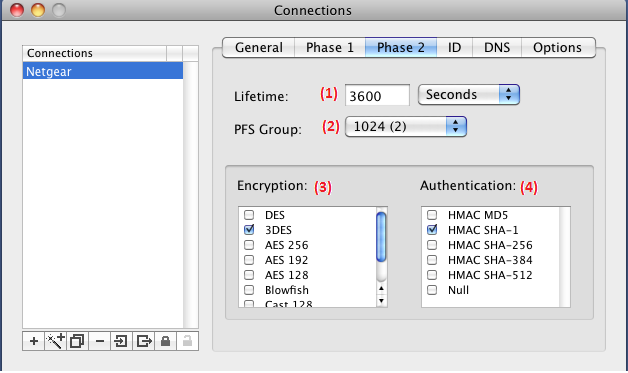
Phase 2 Tab
- Set the Lifetime to match the SA lifetime in your VPN policy.
- Set the PFS Group to match the PFS Key Group in your VPN policy.
- Un-tick all options under Encryption except for the Encryption Algorithm in your VPN policy.
- Un-tick all options under Authentication except for the Integrity Algorithm in your VPN policy.
ID Tab
- Set the Local Identifier to the Remote Identifier Type in your IKE policy.
- Enter the Local Identifier as it shows in the (Remote) Identifier in your IKE policy.
- Set the Remote Identifier to the Local Identifier Type in your IKE policy.
- Enter the Remote Identifier as it shows in the (Local) Identifier in your IKE policy.
- Set your Authentication Method to Preshared Key.
- Enter the Pre-shared Key from your IKE policy.
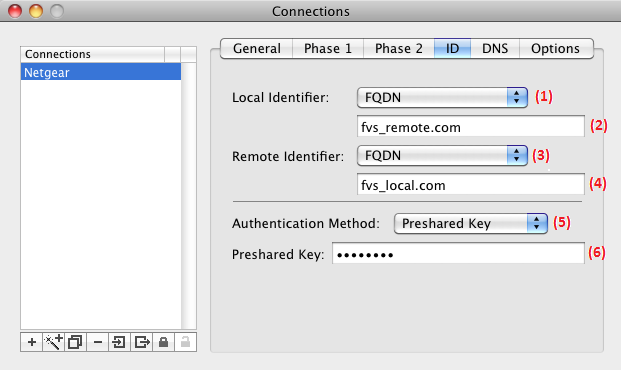
FQDN abbreviates Fully Qualified Domain name.
You can leave the FQDN /DNS and Options Tab’s with their default options.
Close the Connections screen and click on Start to connect the VPN.
Note that the Local identifer on the router end is the same as the Remote ID on the MAC. Similarly the Remote ID on the router, is the same as the local ID on the MAC. This is case sensitive.
Ref: DN-JJM- Doc # 24242 Rev 1.1 November 2013.