

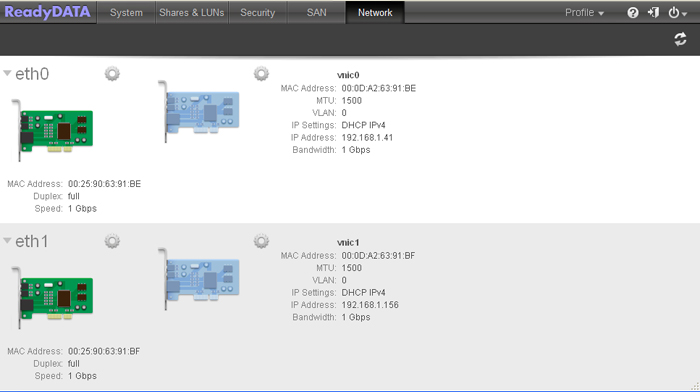
By default, each physical Ethernet interface has one virtual NIC (VNIC) that has the following configuration:
-
A generic label (default name) that is based on the number of the associated Ethernet interface. For example, vnic0 is associated with eth0.
-
DHCP-enabled for IPv4
-
No VLAN membership
The default VNIC has the same numbering as the Ethernet interface that it is associated with (eth0 has vnic0; eth1 has vnic1).
You can add multiple VNICs to each single physical Ethernet interface and channel interface.
To create and configure a VNIC:
1. Click Network.
The Network screen displays:
2. Click the gear icon to the right of an Ethernet interface.
A pop-up menu displays (see the figure in Step 3).
3. Select Create VNIC.

The new VNIC displays next to the Ethernet interface. New VNICs are numbered in sequential and ascending order irrespective of the interface they are attached to. For example, in a system with two Ethernet interfaces, eth0 (with default vnic0) and eth1 (with default vnic1), a new VNIC is numbered vnic2, irrespective of whether you attach it to eth0 or eth1.
4. Click the gear icon to the right of the VNIC that you just created.
A pop-up menu displays:

5. Select Properties.
The VNIC Settings pop-up screen displays with the General pane in view. (You can switch back and forth between the VNIC panes by clicking the General, TCP/IP, and DNS tabs.)
6. Configure the general settings as explained in the following table:
|
Item |
Description |
|
Name |
Use the default name or enter a custom name. The default name is vnicX, in which X is a number in sequential and ascending order irrespective of the interface the VNIC is attached to.
|
|
MTU |
Enter the MTU in bytes. The default setting is 1500 bytes. |
|
VLAN ID |
Enter a VLAN ID. The default setting ID is 0.
|
|
Bandwidth Limit (Mbps) |
Enter the bandwidth limit in Mbps. Depending on the Ethernet interfaces that are installed in the ReadyDATA, the maximum limit is either 1,000 Mbps or 10,000 Mbps. |
7. Click the TCP/IP tab.
The IP settings display. The IPv4 and IPv6 settings are mutually exclusive.
8. Select whether to use IPv4 or IPv6.
When you select a configuration method from the Configure IPv4 drop-down list, the IPv6 settings are dimmed; when you select a configuration method from the Configure IPv6 drop-down list, the IPv4 settings are dimmed.
The following figure shows the IPv4 settings; the next figure shows the IPv6 settings.
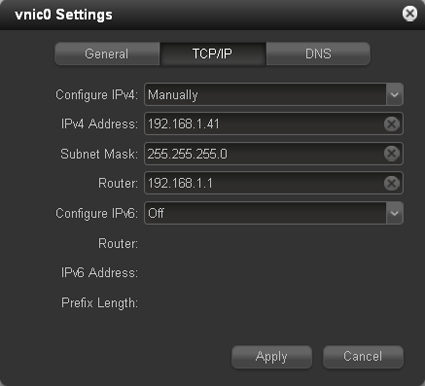

9. Configure the IP settings as explained in the following table:
|
Item |
Description |
|
|
IPv4 settings |
||
|
Configure IPv4 |
From the drop-down list, select how IPv4 is configured:
|
|
|
IPv4 Address |
Enter the IPv4 address for the ReadyDATA. |
Manual configuration only. |
|
Subnet Mask |
Enter the subnet mask for the ReadyDATA. |
|
|
Router |
Enter the IPv4 address for the router through which the ReadyDATA connects to your network. The default setting is 192.168.1.1. |
|
|
IPv6 settings |
||
|
Configure IPv6 |
From the drop-down list, select how IPv6 is configured:
|
|
|
Router |
Enter the IPv6 address for the ReadyDATA. |
Manual configuration only. |
|
IPv6 Address |
Enter the prefix length for the ReadyDATA. The default address is ::1 (that is, 0::1). |
|
|
Prefix Length |
Enter the IPv6 address for the router through which the ReadyDATA connects to your network. The default prefix length is 24. |
|
Note: NETGEAR recommends that you use DHCP address reservation to make sure that the DHCP server always assigns the same IP address to the interfaces of the ReadyDATA. The MAC addresses of the physical interfaces and VNICs are shown on the Network screen.
10. Click the DNS tab.
The DNS settings display:

11. To add a DNS server, click the + button.
12. Enter an IP address.
13. Click Add.
14. (Optional) To add more DNS servers, repeat Step 11 through Step 13.
You can configure multiple DNS servers.
15. (Optional) To remove a DNS server, select the server, and click the - button.
16. Click Apply to save the settings on all three VNIC panes.
Note: If you change the IP address of the ReadyDATA, your browser loses its connection to Dashboard. To reconnect to the ReadyDATA, launch the RAIDar utility, click the Rescan button to locate the device, and click the Setup button to reconnect.