

The following example shows how to create a DHCP server with a dynamic pool.
- Create VLAN 200.
- Select Switching > VLAN > Basic > VLAN Configuration.
A screen similar to the following displays.

- Under VLAN Configuration, in the VLAN ID field, enter 200.
- Click Add.
- Select Switching > VLAN > Basic > VLAN Configuration.
- Add port 1/0/1 to VLAN 200.
- Select Switching > VLAN >Advanced > VLAN Membership.
A screen similar to the following displays.
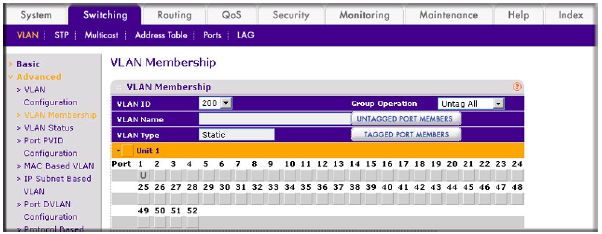
- In the VLAN ID field, select 200.
- Click Unit 1. The ports display.
- Click the gray boxes under ports 1 and 24 until U displays.
The U specifies that the egress packet is untagged for the port.
- Click Apply.
- Select Switching > VLAN >Advanced > VLAN Membership.
- Assign PVID to the VLAN 200.
- Select Switching > VLAN> Advanced > Port PVID Configuration.
A screen similar to the following displays.

- Under Port PVID Configuration, scroll down and select the 1/0/1 check box.
- In the PVID (1 to 4093) field, enter 200.
- Click Apply to save the settings.
- Select Switching > VLAN> Advanced > Port PVID Configuration.
- Create a new DHCP pool.
- Select System > Services > DHCP Server > DHCP Server Configuration.
A screen similar to the following displays.
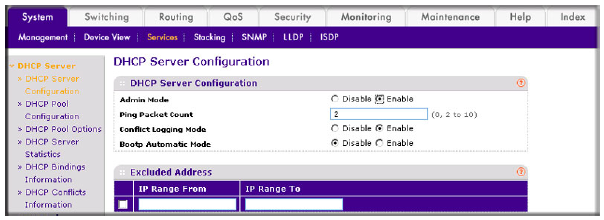
- For Admin Mode, select the Enable radio button.
- Click Apply to enable the DHCP service.
- Select System > Services > DHCP Server > DHCP Pool Configuration.
A screen similar to the following displays.

- Under DHCP Pool Configuration, enter the following information:
- In the Pool Name list, select Create.
- In the Pool Name field, enter pool_dynamic.
- In the Type of Binding list, select Dynamic.
- In the Network Number field, enter 192.168.100.0.
- In the Network Mask field, enter 255.255.255.0. As an alternate, you can enter 24 in the Network Prefix Length field. Do not fill in both the Network Mask field and Network Prefix Length fields.
- In the Days field, enter 1.
- Click Add.
- Select System > Services > DHCP Server > DHCP Server Configuration.
For more information, see the following support articles:
- What is a Dynamic Host Configuration Protocol (DHCP) server and how does it work with my managed switch?
- How do I configure a Dynamic Host Configuration Protocol (DHCP) server in dynamic mode using CLI commands on my managed switch?
This article applies to the following managed switches and their respective firmware:
- M5300 - firmware version 10.0.0.x
-
- M5300-28G (GSM7228S)
- M5300-5G (GSM7252S)
- M5300-28G3 (GSM7328Sv2h2)
- M5300-52G3 (GSM7352Sv2h2)
- M5300-28G_POE+ (GSM7228PSv1h2)
- M5300-52G-POE+ (GSM7252PSv1h2)
- M5300-28GF3 (GSM7328FSv2)
- M4100 - firmware version 10.0.1.x
-
- M4100-26G (GSM7224v2h2)
- M4100-50G (GSM7248v2h2)
- M4100-26G-POE (GSM7226Pv1h1)
- M4100-50G-POE+ (GSM7248Pv1h1)
- M4100-26G-POE (FSM7226Pv1h1)
- M4100-50-POE (FSM7250Pv1h1)
- M4100-D12G (GSM5212v1h1)
- M4100-D10-POE (FSM5210Pv1h1)
- M7100 - firmware version 10.0.1.x
-
- M7100-24X (XSM7224)
- XSM7224S - firmware version 9.0.1.x
Last Updated:07/07/2025
|
Article ID: 21932