This article will help you configure the ADSL settings of your NETGEAR DSL modem router manually.
The information in this article applies if you are configuring a DSL internet connection with a NETGEAR router that uses the genie user interface.


How to manually configure the ADSL settings on a NETGEAR DSL Modem Router with NETGEAR genie:
STEP 1:
Please follow the "Install Your Modem Router" section in the Installation Guide at the link below to setup the physical connections. You can move to the next step after completing page 5.
Click to open Installation Guide.
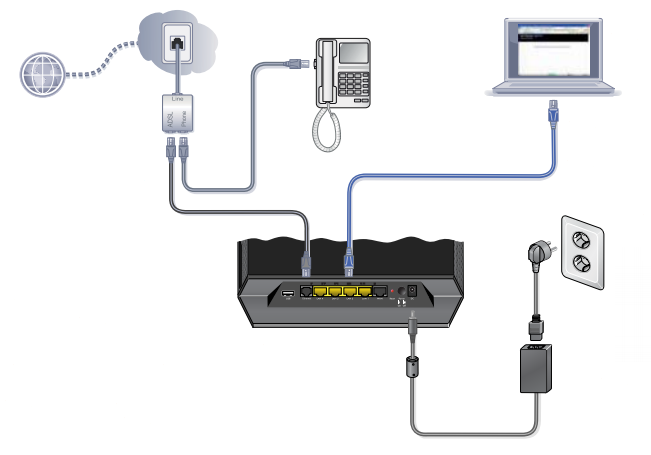
After connecting the devices together, check the lights on the front panel of the router. Make sure the Ethernet port LED is lit for the connected computer.
STEP 2:
If this is the first time configuration, open a web browser to get redirected to the NETGEAR genie Wizard. If you are not redirected, please access the router by using the default IP .
http://192.168.0.1 (or) www.routerlogin.net (or) www.routerlogin.com
Username: admin
Password: password
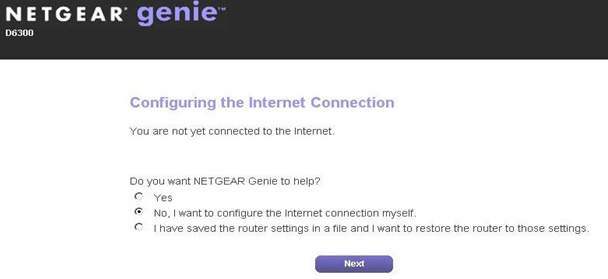
For manual configuration, select No, I want to configure the internet connection myself and click Next.
STEP 3:
Under the Basic Tab, click on Internet.
- Select Yes for the "Does your internet connection requires a login?"
- For PPPoE type of DSL service, click the drop-down arrow under the Internet Service Provider select PPPoE.
- Type the Username and Password given by your ISP.
- Click Apply.
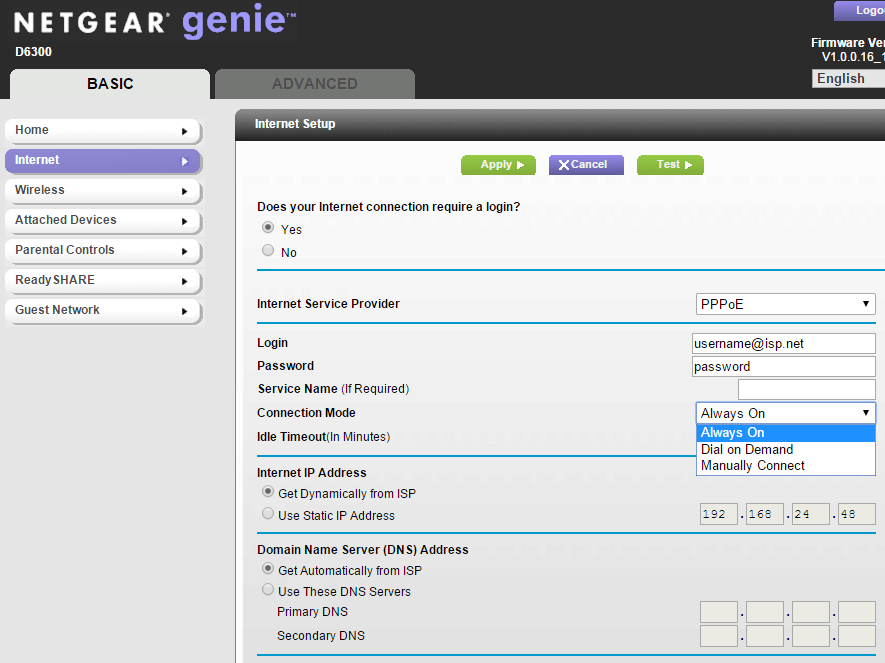
- For the Connection Mode setting: by selecting Dial on Demand option, connection automatically starts when there is outbound traffic to the internet and it automatically terminates if the connection is idle based on the value in the Idle Timeout setting.
- By selecting Always On option, the connection automatically starts when the computer boots up but the connection does not time out. The router will keep trying to bring up the connection if it is disconnected for some reason.
- By selecting Manually Connect option, you must go to the Router Status screen and click the Connect button in order to connect to the Internet. The manual connection does not time out and you have to click the Disconnect button on the Router Status screen to disconnect it.
STEP 4:
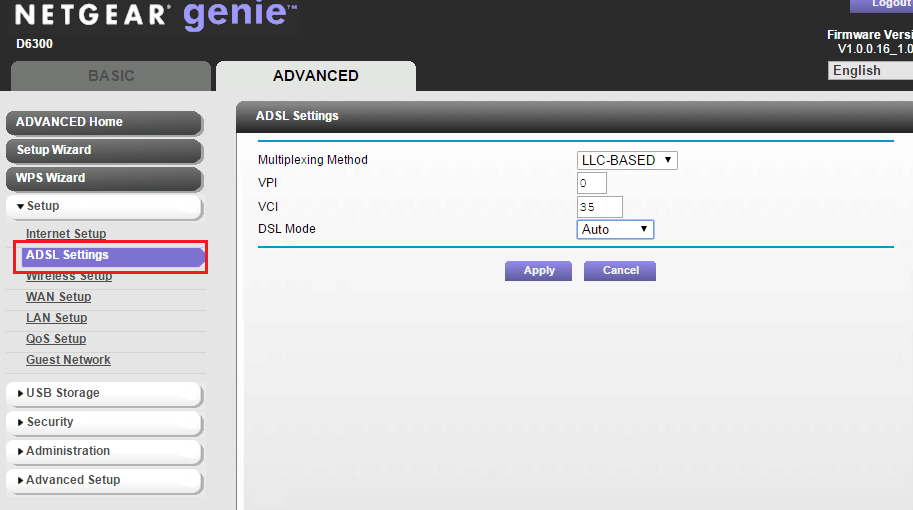
Under the Advanced Tab, click Setup and in the drop down list select ADSL settings.
- Based on the type of connection you have, select the Multiplexing method as VC – BASED or LLC – BASED.
- By Default the VPI and VCI value is set to 8 and 35 respectively. Check with your internet service provider for your VPI and VCI value and enter it in their respective boxes.
- Click Apply.
Below is the list of example ISP's VPI and VCI information. -
Country ISP VPI VCI Multiplexing Method Australia Bigpond Australia 8 35 LLC Exetel 8 35 VC iiNET 8 35 LLC Internode Australia 8 35 VC Optus 8 35 VC Telstra 8 35 VC TPG Internet 8 35 LLC Belgium BASE 8 35 LLC Canada Bell Sympatico 0 35 LLC MTS 8 35 VC Teksavvy 0 35 LLC France FREE 8 36 VC Orange 8 35 VC OVH 8 35 VC SFR 8 35 LLC Italy Telecom Italia 8 35 LLC Spain Orange 8 32 LLC Sweden Telia Sonera 8 35 LLC Switzerland Sunrise 8 35 LLC United Kingdom ADSL24 0 38 VC BETHERE 0 101 LLC O2 0 101 LLC Plusnet 0 38 VC SKY 0 38 VC Talk Talk 0 38 VC United States AT&T 0 35 LLC AT&T 8 35 LLC CenturyLink 0 32 LLC Frontiernet 0 35 LLC NetZero 7 20 LLC Verizon 0 35 LLC
STEP 5:
To check the Internet IP address, Click ADVANCED and look under Internet Port.
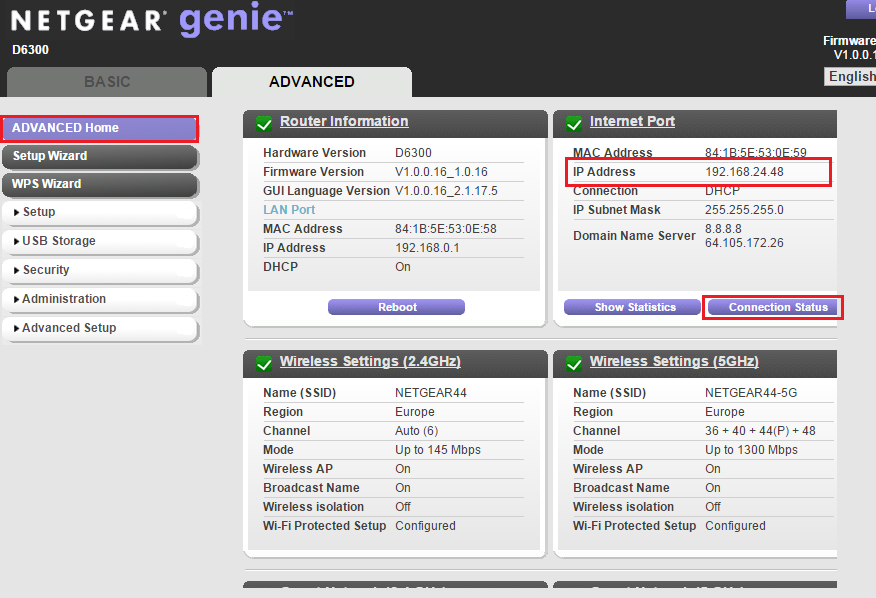
If the IP Address is valid, it is connected to the internet.
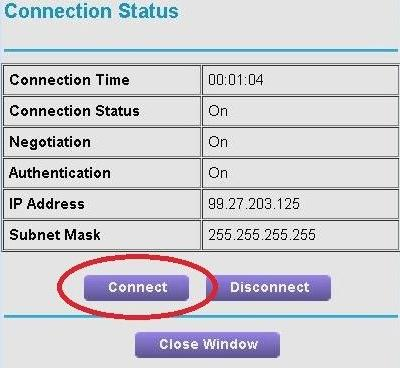
If the Internet IP Address is showing 0.0.0.0, click on Connection Status.
Then, click on Connect to obtain valid IP address and the internet should be working.