

ReadyNAS Remote is a web-based add-on service that allows you to drag and drop files between your ReadyNAS system and your PC or Mac using the CIFS file-sharing protocol. All file permissions and share security settings are retained as if you were on your LAN. All data is encrypted so that it is transmitted securely.
ReadyNAS Remote uses an add-on on your ReadyNAS system and a small software program for your Mac or PC.
Enable ReadyNAS Remote
The ReadyNAS Remote add-on is preinstalled on your ReadyNAS storage system. Before you can access shares using ReadyNAS Remote add-on, you must enable the add-on your ReadyNAS system.
To enable ReadyNAS Remote, follow these steps:
- Select Add-ons > Installed from the FrontView main menu.
A screen displays listing all add-ons currently installed on your ReadyNAS system.
- Scroll down to the ReadyNAS Remote pane.
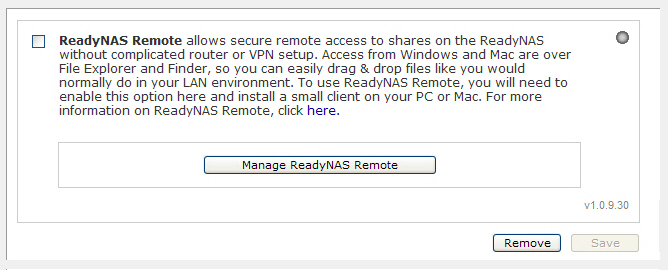
- Select the ReadyNAS Remote check box and click the Save button.
- Click the Manage ReadyNAS Remote button.
The Remote Access window displays.
- Use the interface to grant users permission to access your ReadyNAS system with ReadyNAS Remote add-on.
- Click the Apply Settings button.
- Click the here link in the ReadyNAS Remote description.
An online tutorial about ReadyNAS Remote displays.
- Scroll down to the links for the ReadyNAS Remote client software versions.
- Click the link for the appropriate version for your Mac or PC.
- Follow the prompts to download the ReadyNAS Remote client software to your computer.
Install ReadyNAS Remote Client Software
Before you can access shares using ReadyNAS Remote, you must install the ReadyNAS Remote client software on your Mac or PC.
To install the ReadyNAS Remote client software on your computer, follow these steps:
- Install the ReadyNAS Remote client software.
A wizard guides you through the installation process.
When you complete the installation, you are prompted to create a ReadyNAS Remote account.
- Follow the wizard's prompts to create a free ReadyNAS Remote account.
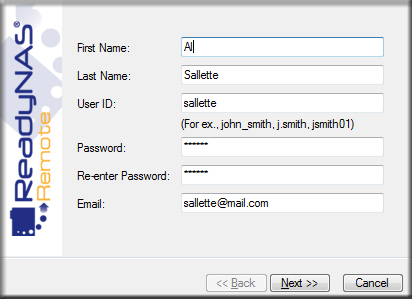
Remember your the user ID and password you create; you need these credentials to access shares.
A pop-up window displays when you successfully register with the ReadyNAS Remote web service.

Access Shares
You can use ReadyNAS Remote to drag and drop files between your computer and your ReadyNAS system, even when your computer is not on the same LAN as your ReadyNAS system.
To access shares using ReadyNAS Remote, follow these steps:
- Ensure that the CIFS file-sharing protocol is enabled on your ReadyNAS system.
For more information, see the How do I manage file-sharing protocols on my ReadyNAS Ultra series, Ultra Plus series, NVX Pioneer, or Pro Pioneer storage system? support article.
- Launch the ReadyNAS Remote client software on your PC or Mac.
- Log in to your ReadyNAS Remote account.
- Connect to your ReadyNAS system.
- Your shares open in a File Explorer (PC) or Finder (Mac) window.
You can now drag and drop files between your PC or Mac and your ReadyNAS system as though you were on the ReadyNAS LAN.