

You can use FrontView to enable file-sharing protocols for your entire ReadyNAS system. For best performance, enable only those file-sharing protocols that you use. For example, if you do not use Linux or Unix computers to transfer files to and from your ReadyNAS system, disable the NFS file-sharing protocol. Disabling file-sharing protocols that you do not use maximizes system memory and improves system performance.
To manage file-sharing protocols, follow these steps:
- Select Services > Standard File Protocols from the FrontView main menu.
The Standard File Protocols screen displays.
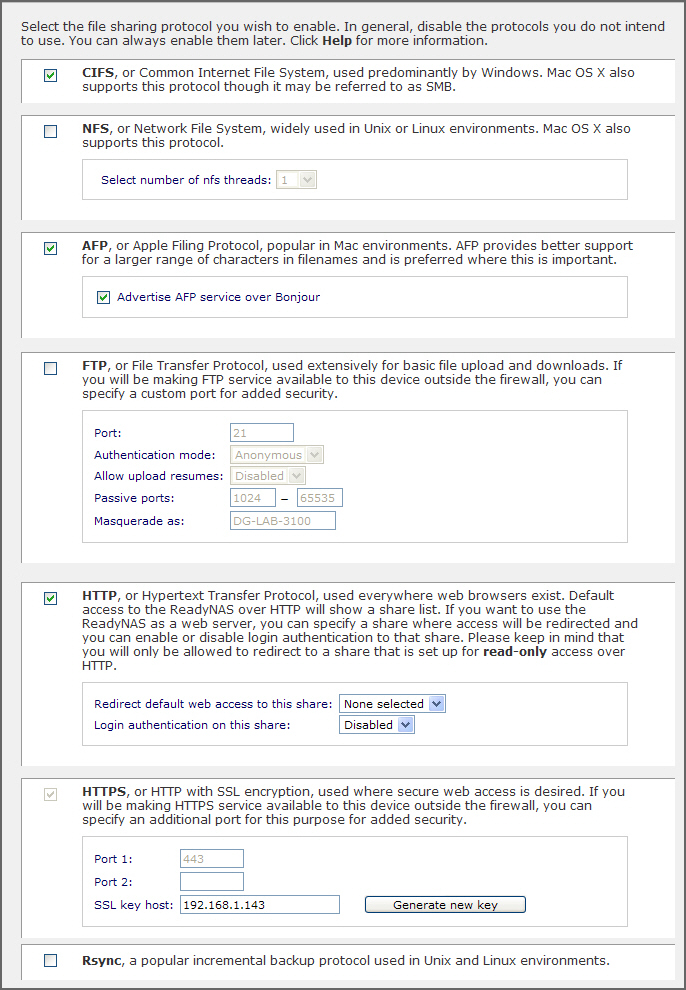
- Select check boxes for any file-sharing protocols that you want to enable.
If you are enabling the FTP file-sharing protocol, note the following:
- Port. Defines the TCP/IP port that the FTP service uses. The default port is 21. This port must be forwarded through the router. See the port forwarding instructions provided with your router.
- Authentication mode. Select User to require anyone trying to access your system using FTP to have a user account. Select Anonymous to waive this requirement.
- Allow upload resumes. Allows users to finish uploading a file to the FTP share if the connection is interrupted. If this option is disabled, if the connection is dropped before the file is completely transferred, the file upload must start over from the beginning.
- Passive port range. Required to enable remote access to your ReadyNAS system over the Internet. Adjust the port range to the maximum number of concurrent sessions you expect to run at one time. If you expect frequent concurrent access from many users, double this number, as each FTP user consumes a passive port.
- Masquerade as. Adjusts the hostname that the FTP server reports to an FTP client.
If you are enabling access HTTP file-sharing protocol, note the following:
- Redirect default Web access to this share. Select a share from this drop-down list if you want to automatically redirect http://<ReadyNAS_IP_address> to that share. This is useful if you do not want to expose your default share listing to outsiders. To redirect to a share, create an index file (such as index.htm or index.html) in your target share and enable the HTTP protocol for read-only access to that share.
- Login authentication on this share. Specifies whether or not authentication is required if users are browsing to the user-created web content on this share.
If you are enabling the HTTPS file-sharing protocol, note the following:
- HTTPS cannot be disabled; FrontView requires it.
- Field details:
- Port 1. Cannot be modified; it is reserved for your ReadyNAS system.
- Port 2. Modify to allow HTTPS connections over a port other than the standard 443. Changing the default HTTPS port requires enabling port forwarding of the port you choose on the router. See the port forwarding instructions provided with your router.
- SSL key host. Configures the hostname used for your ReadyNAS system to generate its SSL certificate and then create a new SSL certificate. NETGEAR recommends that you update this field to match the current IP address of your ReadyNAS system and then generate a new SSL certificate to avoid future certificate errors from your web browser.
In this scenario, it is best to have a fixed IP configuration for your ReadyNAS system so that the certificate remains valid. Also, if the WAN IP address configuration is DHCP, NETGEAR recommends that you use a Dynamic DNS service to access the ReadyNAS through a persistent fully qualified domain name provided by a DDNS service provider rather than through an IP address.
- If you are enabling the Rsync file-sharing protocol, you can require a user name and password from anyone trying to access a share using the Rsync file-sharing protocol. These requirements are established at the share level. For more information, see the support article.
- Clear check boxes for any file-sharing protocols that you want to disable.
- Click the Apply button.
Your changes are saved.
Last Updated:07/30/2025
|
Article ID: 21245