

Use the boot menu to restart or troubleshoot your ReadyNAS storage system. Your storage system has the following boot modes:
- Normal. Initiates a normal boot process, just like booting using the Power button.
- Factory default. Initiates a short disk test that takes approximately 5 minutes, then begins a 10-minute time-out period waiting for RAIDar. During the 10-minute time-out period, the system can be powered off safely without causing any data loss. After 10 minutes, or if you select the factory default option with RAIDar during the time-out period, the factory default process begins.
-
WARNING: The factory default reboot process resets the unit to factory settings, erases all data, resets all defaults, and reformats the disk to X-RAID2.
- OS reinstall. Reinstalls the firmware from the internal flash to the disks. Use the OS reinstall boot mode when the system crashes and corrupts some configuration files. OS reinstall boot mode also resets some settings on your storage system, such as Internet protocol settings and the administrator password, to defaults.
- Tech support. Boots into a low-level diagnostic mode. Use the tech support boot mode only when instructed to do so by a NETGEAR technical support representative.
- Skip volume check. After a system crash, the system tries to scan and fix the volume using a file system check. If several problems are found on a disk, this process can stall, causing the system not to boot. Use this option to skip the scan and let the system boot.
-
WARNING: Use the skip volume check boot mode only when instructed to do so by a NETGEAR Technical Support representative, otherwise data loss might occur.
- Memory test. Performs a memory test. The pass or fail result is reported using the storage system's LEDs. Contact a NETGEAR technical support representative to interpret memory test results.
- Disk Test. Performs an offline full disk test. This can take 4 hours or more, depending on the size of your disks. Any problems are reported in the RAIDar discovery tool.
To access the boot menu:
- Power off your storage system.
- Using a straightened paper clip, press and hold the Reset button.
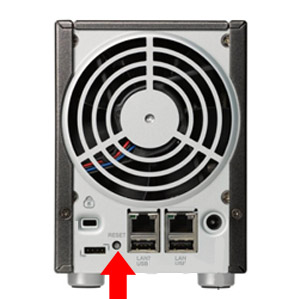
- Press the Power button to power on your system.
- Continue to press the Reset button until the Power button LED, USB and backup status LED, disk 1 LED, and disk 2 LED illuminate.
- Release the Reset button.
- Press the Backup button to scroll through boot mode options.
Your system shows the boot mode options using the LEDs, as described in the following table:
Boot Mode
Status Indicator Description Power 1 LED
Disk 1 LED
Disk 2 LED
USB and Backup LED
Normal Power LED illuminates. 

Factory Default Disk 1 LED illuminates. OS reinstall Disk 2 LED illuminates. Tech Support USB and Backup status LED illuminates. Skip volume Check Power LED and disk 1 LED illuminates. Memory Test Power LED and disk 2 LED illuminate. Disk test Power LED and USB and backup status LED illuminate Legend:
- On:
- Off:
- On:
- Press and release the Reset button to confirm your boot menu selection.
The system boots in the selected boot mode.
Last Updated:07/07/2025
|
Article ID: 21100