

Note: The following configuration was tested with NETGEAR FVS318v3 firmware version 3.0.21 NETGEAR ProSAFE VPN Client Software version 10.5.1 (Build 8). This article was written in 2009 using VPN01L software. This is not Windows 7 compatible, and has been replaced by VPNG01L ( 1 user ) or VPNG05L ( 5 user ).
To configure the FVS318v3:
- Log in to the FV318v3’s admin GUI.
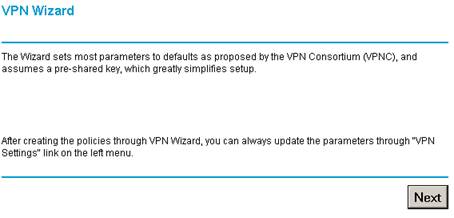
- Click the VPN Wizard on the left panel under VPN.
- Click Next.
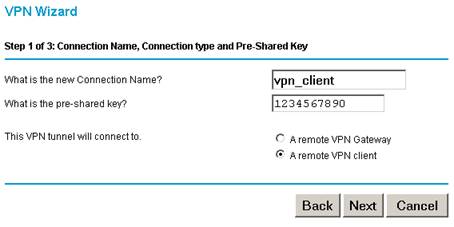
- Enter a connection name and a value for the pre-shared key. The same name and pre-shared key have to be entered when configuring the ProSAFE VPN client software. Select This VPN tunnel will connect to A remote VPN client. Click Next.
- A summary of the VPN policy will be displayed. Click Done. If you do not click Done, the VPN policy will not be created.

- You can review the IKE policy and VPN policy by clicking IKE Policies.

- In most cases, you can just leave the VPN policy as is.

To configure the ProSAFE VPN client software:
- Right click the ProSAFE VPN client icon
 on the system tray and select Security Policy Editor.
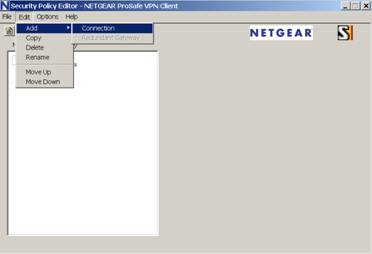
 - Under the Edit menu, select Add and select Connection.
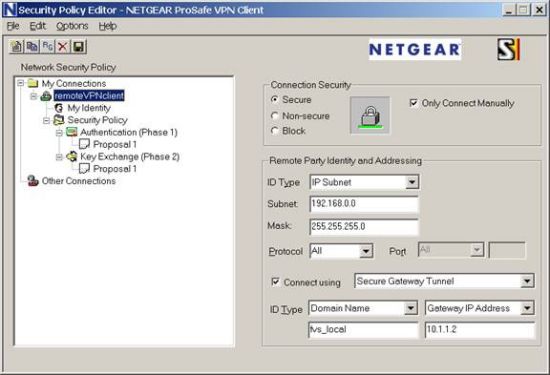
- A new connection will be created. You can rename the connection by double clicking the name. On the right panel, under Remote Party Identity and Addressing, select IP Subnet as ID Type, enter the LAN subnet on the FVS318v3 as Subnet and enter the LAN subnet mask as Mask. Select All for Protocol. Check the box "Connect using" and select "Secure Gateway Tunnel". For ID Type, select Domain Name and enter fvs_local under Domain Name. Select Gateway IP Address and enter the WAN IP address of the FVS318v3.
- On the left panel, click Security Policy. On the right panel, select Aggressive Mode under Phase 1 Negotiation Mode. Make sure "Enable Perfect Forward Secrecy" is unchecked. Leave "Enable Replay Detection" checked.

- Click My Identity on the left panel. On the right panel, select None under Select Certificate. For ID Type, select Domain Name and enter
vpn_client<1-8>.fvs_remote_<policy name>
where the policy name is the VPN policy name you entered when configure VPN Wizard on the FVS318. The number 1-8 is being used to distinguish between multiple VPN client users connected to the FVS318v3 at the same time. In our example, the domain name will be vpn_client<1-8>.fvs_remote_vpn_client. Another VPN client user can use vpn_client2.fvs_remote_vpn_client as domain name. etc. For Virtual Adapter, select Disabled. Select Any for Internet Interface. If you cannot find Domain Name under ID Type, you may not have select Aggressive mode under Security Policy as indicated on Step (4).

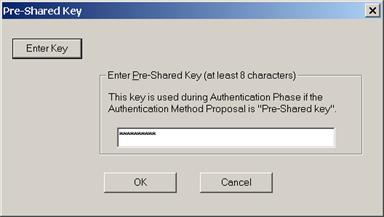
- Click the Pre-Shared Key button, and Click the Enter Key. Enter the same pre-shared key you entered when configuring the FVS318v3. Click OK.
- On the left panel, expand Security Policy and Authentication (Phrase 1) and click Proposal 1. On the right panel keep everything as default. Make sure they match the screen below.

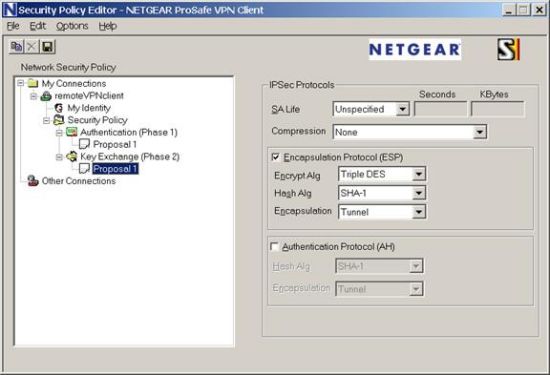
- On the left panel, expand on Key Exchange (Phrase 2) and click Proposal 1. On the right panel, leave everything as default. Make sure they match the screen below.
- Save the policy by clicking the Save button or select File > Save.
- To connect, right click the ProSAFE VPN client icon on the system tray and select Connect, select the Connection Profile you just created.

- A connection status window should be displayed and eventually, it should say "Successfully connected to <your connection profile>".

- You can test the VPN by pinging resources behind the FVS318v3.
If the VPN will not connect, double check the parameters in both the FVS318v3 and the VPN Client Policy, make sure they are matching on both sides.
For more troubleshooting, you can review the VPN log on the FVS318v3 and the Log Viewer on the ProSAFE VPN client by right clicking the ProSAFE VPN client icon on the system tray and selecting Log Viewer. A successful connection should appear as follow in the Log Viewer:

N101769.asp Jun.18, 2008