

For environments where reliable Internet access is critical, you can set up your NETGEAR mobile hotspot (MHS) with an MD200 MHS cradle to transition a primary fixed Internet connection (such as a home cable or business fiber Internet connection) to the hotspot’s secondary 5G broadband connection in case of downtime or instability in the primary connection (also known as WAN to WWAN passthrough).
If downtime or instability in the primary connection occurs:
- With a cradle: The Internet connection can be automatically switched over, without manual intervention.
- Without a cradle: You must manually disconnect the cable from your hotspot to the primary gateway (a modem or router) to restore the Internet connection over the hotspot’s 5G broadband connection.
To use failover mode on your hotspot with a cradle, you need a gateway that provides the primary Internet connection. The gateway can be a cable, fiber, Starlink, fixed wireless, or another type of modem or router. If the gateway’s primary Internet connection goes down, failover mode allows for automatic switchover to the hotspot’s 5G broadband connection.
For failover mode, you must keep your hotspot always docked in the cradle.
If you undock your hotspot, the cradle switches off, causing the primary Internet connection to be halted until the hotspot is docked again. For this reason, we do not recommend failover mode if you need to undock your hotspot often.
If you occasionally need to undock the hotspot from the cradle and do not mind the temporary loss of Internet connection, you can manually unplug the cable from the cradle's Internet port and plug it into the modem or router’s Internet port to reestablish the Internet connection.
The following figure shows a setup with a modem on the left, a hotspot seated in a cradle in the middle, and an Orbi router on the right. The Orbi router (or another WiFi router) is not strictly required for failover mode but would often be used in a realistic environment.
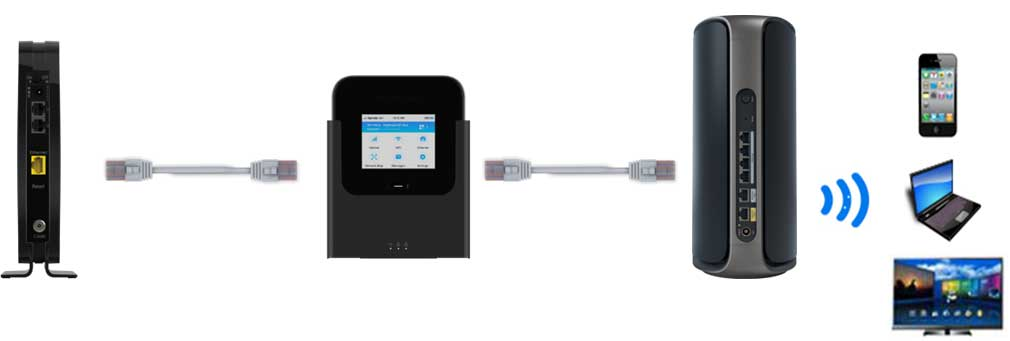
- Locate the Ethernet cable that supplies an incoming Internet connection to your router.
In the previous figure, this is the Orbi router on the right.
This cable might come from a cable modem, a wall-mounted Ethernet jack, or another type of device.
In the previous figure, this is the modem on the left. - On your router, disconnect the Ethernet cable from the router's Internet or WAN port.
- On your cradle, connect the cable to the WAN/LAN port.
In the previous figure, this is the cradle with seated hotspot in the middle. - Using another Ethernet cable, connect the LAN port on your cradle to your router's Internet or WAN port.
The cradle now bridges your incoming Internet line or device and your router. - Connect the cradle to a suitable USB power source.
The cradle’s power LED lights. - Slide your hotspot into the cradle with the ports facing down.
Caution: Do not force or drop your hotspot into the cradle. Doing so might damage your hotspot, cradle, or both.
Note: If your hotspot is powered off, it powers on when inserted into the cradle.
The cradle cooling fan activates. The cradle’s LAN and WAN/LAN LEDs light.
By default, the Ethernet + 4G/5G Backup feature is enabled on your hotspot.
Note: Ethernet + 4G/5G Backup used to be called Ethernet Offloading.
- From a computer or WiFi device that is connected to the hotspot, launch a web browser.
- Type http://192.168.1.1.
The hotspot web page displays. - Log in using your admin password.
The password is the one that you specified when you set up your hotspot. The password is case sensitive.
The web user interface dashboard displays. The dashboard displays any active alerts. - From the web user interface dashboard, select Settings > Internet.
The Internet page displays. - Click or tap Ethernet + 4G/5G Backup.
- Click or tap Apply.
A message displays telling you that to save this change, your device must restart WiFi connections. - Click or tap Continue.
Your settings are saved.