

Thank you for purchasing a NETGEAR Nighthawk 5G M7 Portable WiFi Hotspot. This quick start guide provides the basic steps required to set up your Nighthawk 5G M7 with an iOS or Android mobile device and the NETGEAR app.
For comprehensive setup and advanced configuration information, including web user interface setup instructions, refer to the Nighthawk 5G M7 user manual.
Setup options differ slightly between Nighthawk 5G M7 models. Check the label on the back of your Nighthawk to confirm which specific model you have before proceeding.
Your Nighthawk 5G M7 package includes the following items:
- Nighthawk 5G M7 device
- USB-C charging and tethering cable
- SIM card release tool
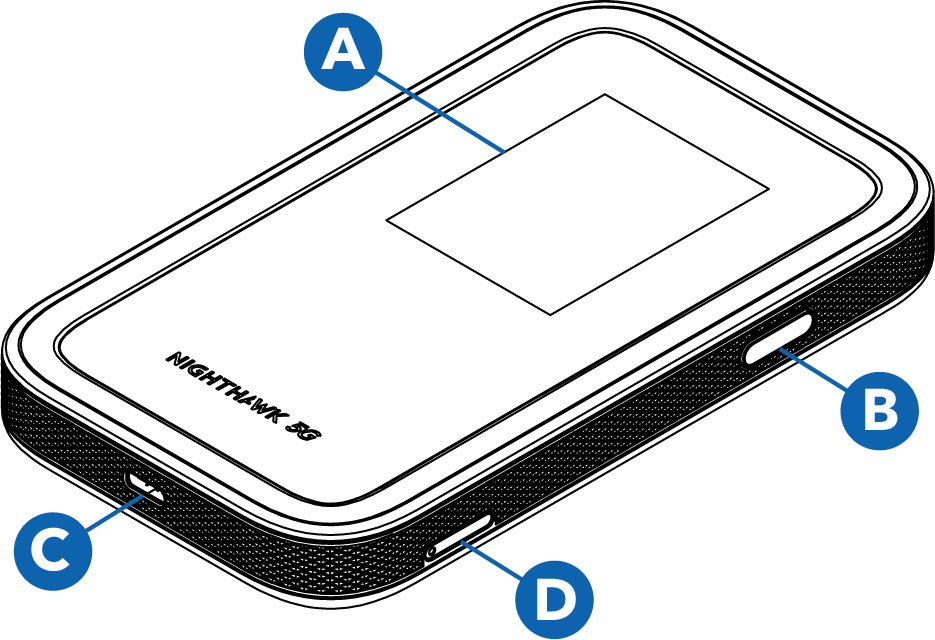
The Nighthawk 5G M7 device has an LCD screen (A), a Power/Navigation button (B) to navigate the user interface, and a USB-C port (C) for charging and tethering. A SIM card tray (D) is provied for a physical 4FF Nano SIM card.
To set up and use your Nighthawk 5G M7, download the NETGEAR app, complete first time setup, set up an eSIM* or install a SIM card, then connect to WiFi. Click or tap each dropdown section below for instructions on each step.
If your Nighthawk 5G M7 already has a physical SIM card installed, SIM setup is not required; proceed to Connect to WiFi after completing first time setup.
To download the app, visit the NETGEAR app page on your iOS or Android mobile device, or use the following links:


After downloading the NETGEAR app, power on the Nighthawk to complete the setup process.
NOTE: When idle, the screen goes dark to save power. Quickly press and release the Power/Navigation button to wake the screen.
To power on your Nighthawk and finish setup:
- Press and hold the Power/Navigation button for two seconds.
The NETGEAR logo displays and your Nighthawk starts up. - Launch the mobile app and follow the prompts to log into or create your NETGEAR account.
- When prompted, use the app to scan the QR code displayed on the Nighthawk screen.
- Follow the in-app prompts to set up your Nighthawk.
To access the Internet with your Nighthawk, you can purchase a travel eSIM^ via the NETGEAR app, set up an existing eSIM* with the NETGEAR app, or install a physical SIM card.
NOTE: If you use your own third-party eSIM* or physical SIM card for cellular data, check with your carrier to make sure it's valid, activated, and compatible with mobile hotspot/router devices. NETGEAR cannot guarantee compatibility with eSIMs or SIM cards purchased from other vendors.
To purchase and install an eSIM^ in the NETGEAR app:
- From the NETGEAR app dashboard, tap Buy an eSIM.
You can also tap Get a NETGEAR eSIM from the app device dashboard. - Tap Region to shop for eSIMs based on a larger region, or Country to search for eSIMs by specific country.
All eSIM plans are regional, but searching by country can help you find a plan that works for your travel needs. - Select a plan option that best meets your needs, then tap Checkout.
- Select a payment method, review your purchase and check the box to indicate you agree with NETGEAR's Terms of Service and Privacy Policy.
If you have a discount code, you can enter it in the Add Discount Code field and apply it to your purchase. - Tap Pay Now to complete your eSIM purchase.
- Tap Continue to download and save your eSIM to your Nighthawk.
- Tap Use eSIM Now to activate your eSIM immediately, or Use eSIM Later to manually activate your eSIM later on.
Your eSIM purchase and install is complete.
To set up a third-party eSIM* in the NETGEAR app:
- From the NETGEAR app dashboard, tap Manage SIMs.
- Tap the + (plus) symbol in the top right corner, then Add My Own eSIM.
- Select Scan QR Code and scan the eSIM code to add your eSIM.
Your third-party eSIM is set up.
To install or replace a physical SIM card:
- Locate the SIM card tray (D) on the Nighthawk.
- Using the included release tool, press into the hole on the SIM card tray to eject the tray.
- If a SIM card is already installed in the tray, remove the SIM card.
- Insert the replacement SIM card in the tray.
- Insert the SIM card tray back into its slot on the Nighthawk.
When your Nighthawk is powered on, it broadcasts a WiFi network name (SSID) and password. You can connect to the Internet by scanning the quick connect QR code on your Nighthawk's WiFi screen, or selecting your Nighthawk's SSID and entering the password on your WiFi devices.
To connect to WiFi using the QR code:
- Quickly press and release the Power/Navigation button to wake your Nighthawk.
- Press the Power/Navigation button one time to cycle to the WiFi screen.
The WiFi screen displays with a QR code that you can scan to connect directly to the network. - Open your mobile device's camera application and aim the camera at the QR code.
Depending on your mobile device, you might need to tap the QR code in your camera app to proceed.
Your mobile device connects to your Nighthawk's WiFi network.
To connect to WiFi using the SSID and password:
- Quickly press and release the Power/Navigation button to wake your Nighthawk.
- Press the Power/Navigation button one time to cycle to the WiFi screen.
The screen displays your Nighthawk's SSID in the WiFi Name field and your password in the Password field for other devices to connect with. - From your WiFi device, open your WiFi network connection manager.
- Select or enter the SSID shown on your Nighthawk's home screen.
- Enter the password shown on your Nighthawk's home screen.
Your WiFi device connects to your Nighthawk's WiFi network.
* Not applicable to model MH7110-1TLAUS at launch. To be enabled in future update.
^ NETGEAR eSIM Marketplace is only available on MH7150 models.