

New Feature and Enhancements:
- Support for OpenVPN:
- OpenVPN is a virtual private network (VPN) system that lets you set up secure point-to-point connections for routed or bridged configurations and remote access locations.
- OpenVPN client devices, such as laptops (Windows, MacOS) and smart phones (iOS, Android), can connect to a company network or remote server over OpenVPN with TUN or TAP mode to access the network resources and their services in a secure manner.
- A TUN-style network provides layer 3 network connectivity, whereas a TAP-style network provides almost all the functionality of a layer 2 network.
- OpenVPN supports a single tunnel configuration, which allows up to 30 VPN users to connect through VPN securely.
|
Devices |
OS Version |
OpenVPN Connect (TUN) |
OpenVPN GUI (TUN and TAP) |
Tunnelblick (TUN and TAP) |
|
MacOS |
Ventura 13.6.6 Sonoma 14.x |
Supported |
NA |
Supported |
|
Windows |
10 11 |
Supported |
Supported |
NA |
|
iOS |
17.4.1 |
Supported |
NA |
NA |
|
Android |
13 14 |
Supported |
NA |
NA |
|
Linux (Ubuntu) |
Built-in VPN |
NA |
NA |
NA |
|
iPadOS |
16.7.7 17 |
Supported |
NA |
NA |
Note: TAP mode is not supported for iOS, iPadOS, and Android.
Linux supports NativeVPN (TUN/TAP mode)
- Multi-language support (French, German, Italian, Japanese, and Spanish)
- Support for DHCP options 15 (domain name) and 42 (NTP server address)
- Support for VPN user access control
- Performance improvements on IPSec Client-to-Site VPN
Security Fixes:
- This firmware addresses security vulnerabilities. For more information about security vulnerabilities, visit https://www.netgear.com/about/security.
Bug Fixes:
- Fixes the issue where diminished throughput occurs on the WAN2/LAN5 port because flow control is enabled by default.
- Fixes the issue where an IPSec tunnel remains disconnected even though dead peer detection (DPD) is enabled.
- Fixes the issue where an IPSec Client-to-Site tunnel doesn’t establish after a WAN failover.
- Fixes the issue where an IPSec Client-to-Site VPN tunnel doesn’t function optimally.
- Fixes the issue where an IPSec Client-to-Site VPN tunnel doesn’t function over the WAN2 interface.
- Fixes the issue where an inbound PPTP/GRE VPN connection is not working.
- Fixes the issue where you cannot log in to the device UI because the user login limit is reached.
- Fixes the issue where a VPN client cannot access webpages over a full tunnel when the http or https port forwards a rule that is configured for a webserver.
Known Issues:
- In a Dual WAN configuration, an IPSec tunnel shows the status as “UP” on the secondary WAN interface while the primary WAN interface is active.
Workaround: The IPSec tunnel works on the active WAN interface; the other tunnel is for backup. - You can configure the OpenVPN IP address range for VPN clients in the same subnet as the LAN and WAN subnets.
Workaround: Configure the OpenVPN IP address range for VPN clients in a different subnet from the LAN and WAN subnets. - Clients that are connected over VPN cannot access the Internet if the site-to-site remote IP address is the same as an IP address in the range for VPN clients.
Workaround: Make sure that the site-to-site remote IP address does not conflict with an IP address in the range for VPN clients. - With more than one VLAN configured, the IP address of a connected client is not updated after the LAN IP address change
Workaround: Disconnect and reconnect the LAN port network cable. - The time stamp of a syslog entry is not adjusted according to the local time zone.
Workaround: Interpret the log events in the system time.
Download link: https://www.downloads.netgear.com/files/GDC/PR60X/PR60X-V2.4.0.100.zip
Firmware Update Instructions:
To update your product’s firmware, follow the instructions in your product’s user manual. To find your user manual, visit https://www.netgear.com/support/, enter your model number in the search box, and click the Documentation button on the product page.
The following sections also describe how you can update the firmware.
Manually Update Firmware after Initial Setup:
- Download the latest PR60X V2.4.0.xx firmware file from the NETGEAR support site (https://www.netgear.com/support/).
- Launch a web browser from a computer that is connected to a PR60X LAN port.
- Enter the IP address that is assigned to the router.
If your computer is directly connected to the LAN port, enter https://www.routerlogin.net. Otherwise, enter https://<IP-address-of-router>.
Note: If the IP address of the router is its default address of 192.168.1.1, enter:
https://192.168.1.1
A login page displays.
If your browser displays a security warning, you can proceed, or add an exception
for the security warning. For more information, see https://kb.netgear.com/000062980. - Enter the router user name and password. The user name is admin. The password is the one that you specified when you set up the router. The user name and password are case-sensitive.
If you did not yet specify a custom password, the default password is password (also stated on the router label). - Click the LOGIN button.
The Dashboard page displays. - Select Administration > Firmware Update
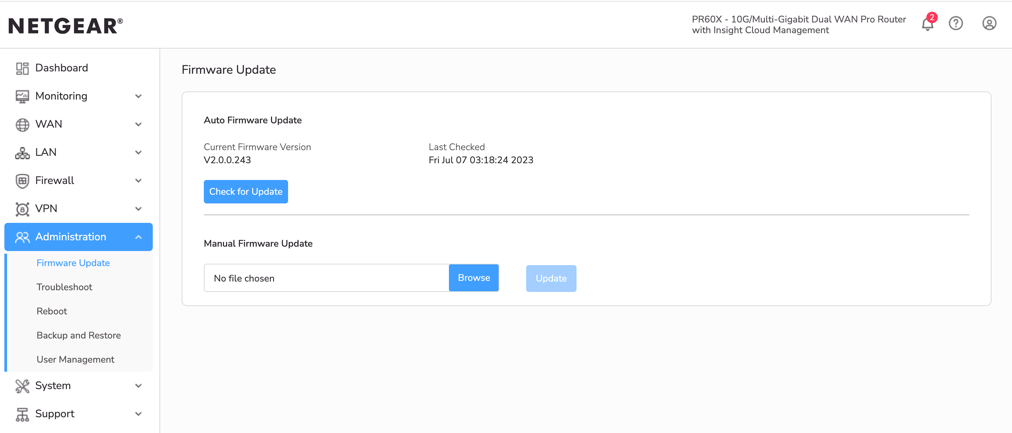
- Locate and select the firmware file on your computer by doing the following:
- In the Firmware Update section, click the Browse button.
- Navigate to the firmware file.
The file name ends in .bin. - Select the firmware file.
- Click the Update button.
A Firmware update confirmation pop-up window displays. - Click the Update button.
The page displays the update progress. The update takes about 90 seconds.
WARNING: To avoid the risk of corrupting the firmware, do not interrupt the update. For example, do not close the browser, click a link, or load a new page. Do not turn off the router. Wait until the router finishes. - When the update is finished, log back into the router.
The firmware version displays on the Dashboard page.
Let the Router Automatically Update the Firmware During Initial setup:
- Launch a web browser from a computer that is connected to a PR60X LAN port.
- Enter the IP address that is assigned to the Router.
If client is directly connected to the routers LAN network, you can enter https://www.routerlogin.net. Otherwise, enter https://<IP-address-of-Router>.
Note: If the IP address of the router is its 192.168.1.1 default address, enter
https://192.168.1.1.
A login page displays.
If your browser displays a security warning, you can proceed, or add an exception
for the security warning. For more information, see https://kb.netgear.com/000062980. - Enter password as the router login password (also stated on the router label) and click the LOGIN button. The password is case-sensitive.
The Welcome page displays. - Click the Next button.
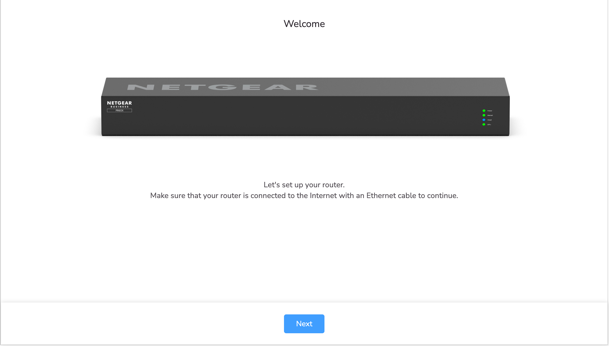
- On the Terms of Services page, click the I Agree button.
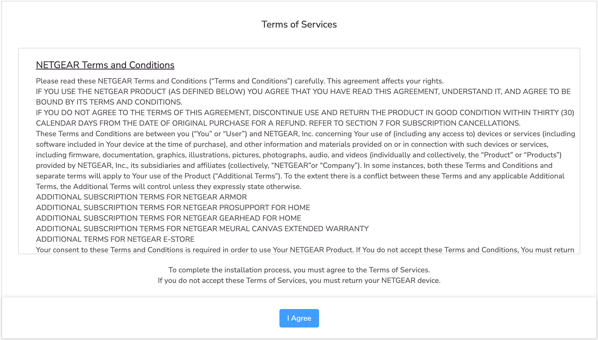
- On the Internet Detected page, click the Next button.
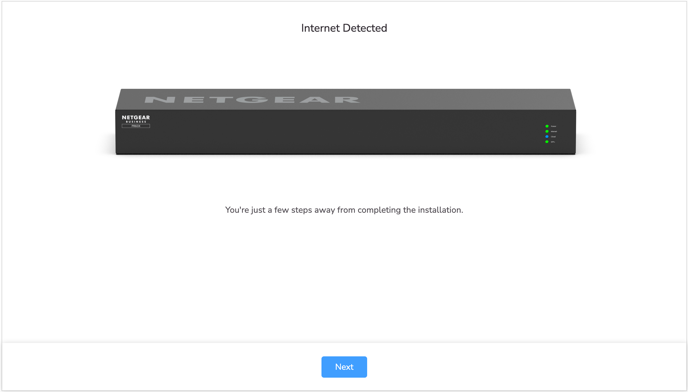
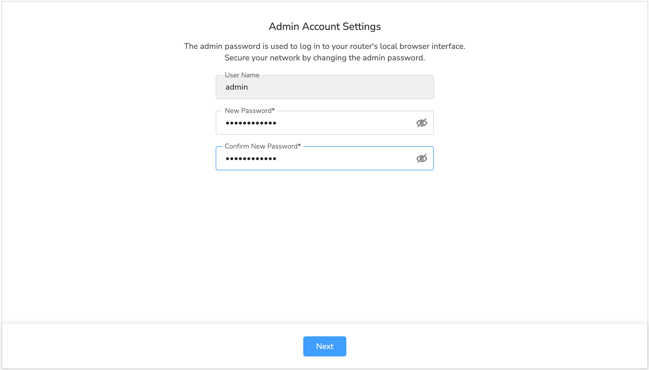
- On the Admin Account Settings page, set a new router login password, and click the Next button.
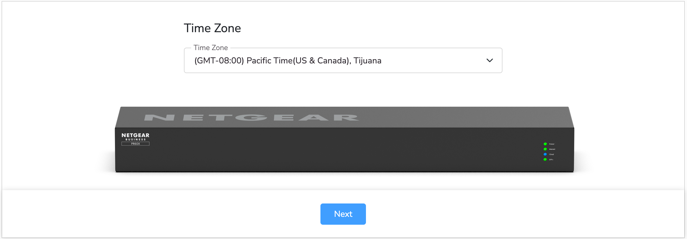
- On the Time Zone page, select your time zone, and click the Next button.
- If the New Firmware Detected page displays, click the Next button.
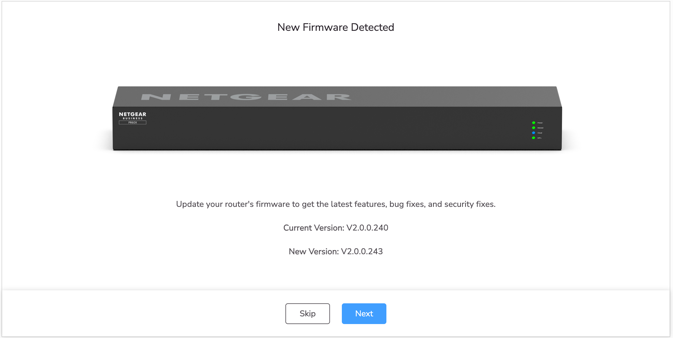
A pop-up window displays. - In the pop-up window, click the Update button.
- Wait for the upgrade to complete.
- In the Firmware update complete pop-up window, click the OK button.
- When the update is finished, log back into the router.
The firmware version displays on the Dashboard page.
Let the Router Automatically Update the Firmware when the Router Detects a New Version:
- Launch a web browser from a computer that is connected to a PR60X LAN port.
- Enter the IP address that is assigned to the router.If your computer is directly connected to the LAN port, enter https://www.routerlogin.net. Otherwise, enter https://<IP-address-of-router>.
Note: If the IP address of the router is its 192.168.1.1 default address, enter: https://192.168.1.1
A login page displays.
If your browser displays a security warning, you can proceed, or add an exception
for the security warning. For more information, see https://kb.netgear.com/000062980. - Enter the router user name and password. The user name is admin. The password is the one that you specified when you set up the router. The user name and password are case-sensitive.
If you did not yet specify a custom password, the default password is password (also stated on the router label). - Click the LOGIN button.
The Dashboard page displays.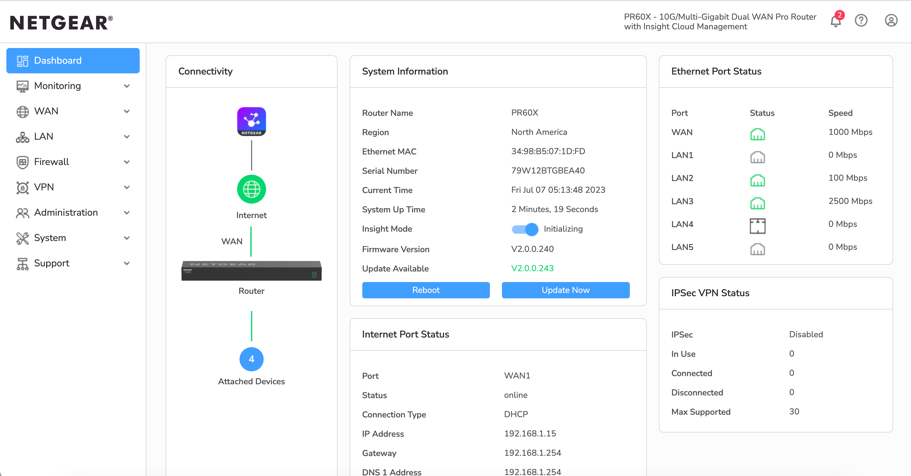
- In the System Information pane, click the Update Now button.
A Firmware update confirmation pop-up window displays. - Click the Update button.
The router locates and downloads the firmware and begins the update. The page displays the update progress. The update takes about 90 seconds.
WARNING: To avoid the risk of corrupting the firmware, do not interrupt the update.
For example, do not close the browser, click a link, or load a new page. Do not turn off the router. Wait until the router completely finishes update and subsequent reboot process. - When the update is finished, log back into the router.
The firmware version is displayed on the Dashboard view.