

- Create an Insight account. For more information, see How do I create an Insight account?
- Add your NETGEAR business routers to your Insight account. For more information, see How do I discover, add, and register switches, access points, and Orbi Pro WiFi Systems in Insight?.
- Purchase Insight Business VPN credit. For more information, see How do I purchase Business VPN credit?.
- Set up a VLAN network with your Insight account. For more information, see How do I set up a custom VLAN in Insight?.
- If available, enable your 30-day free trial of Insight Business VPN service. For more information, see How do I enable the Insight Business VPN 30-day free trial on my remote router?.
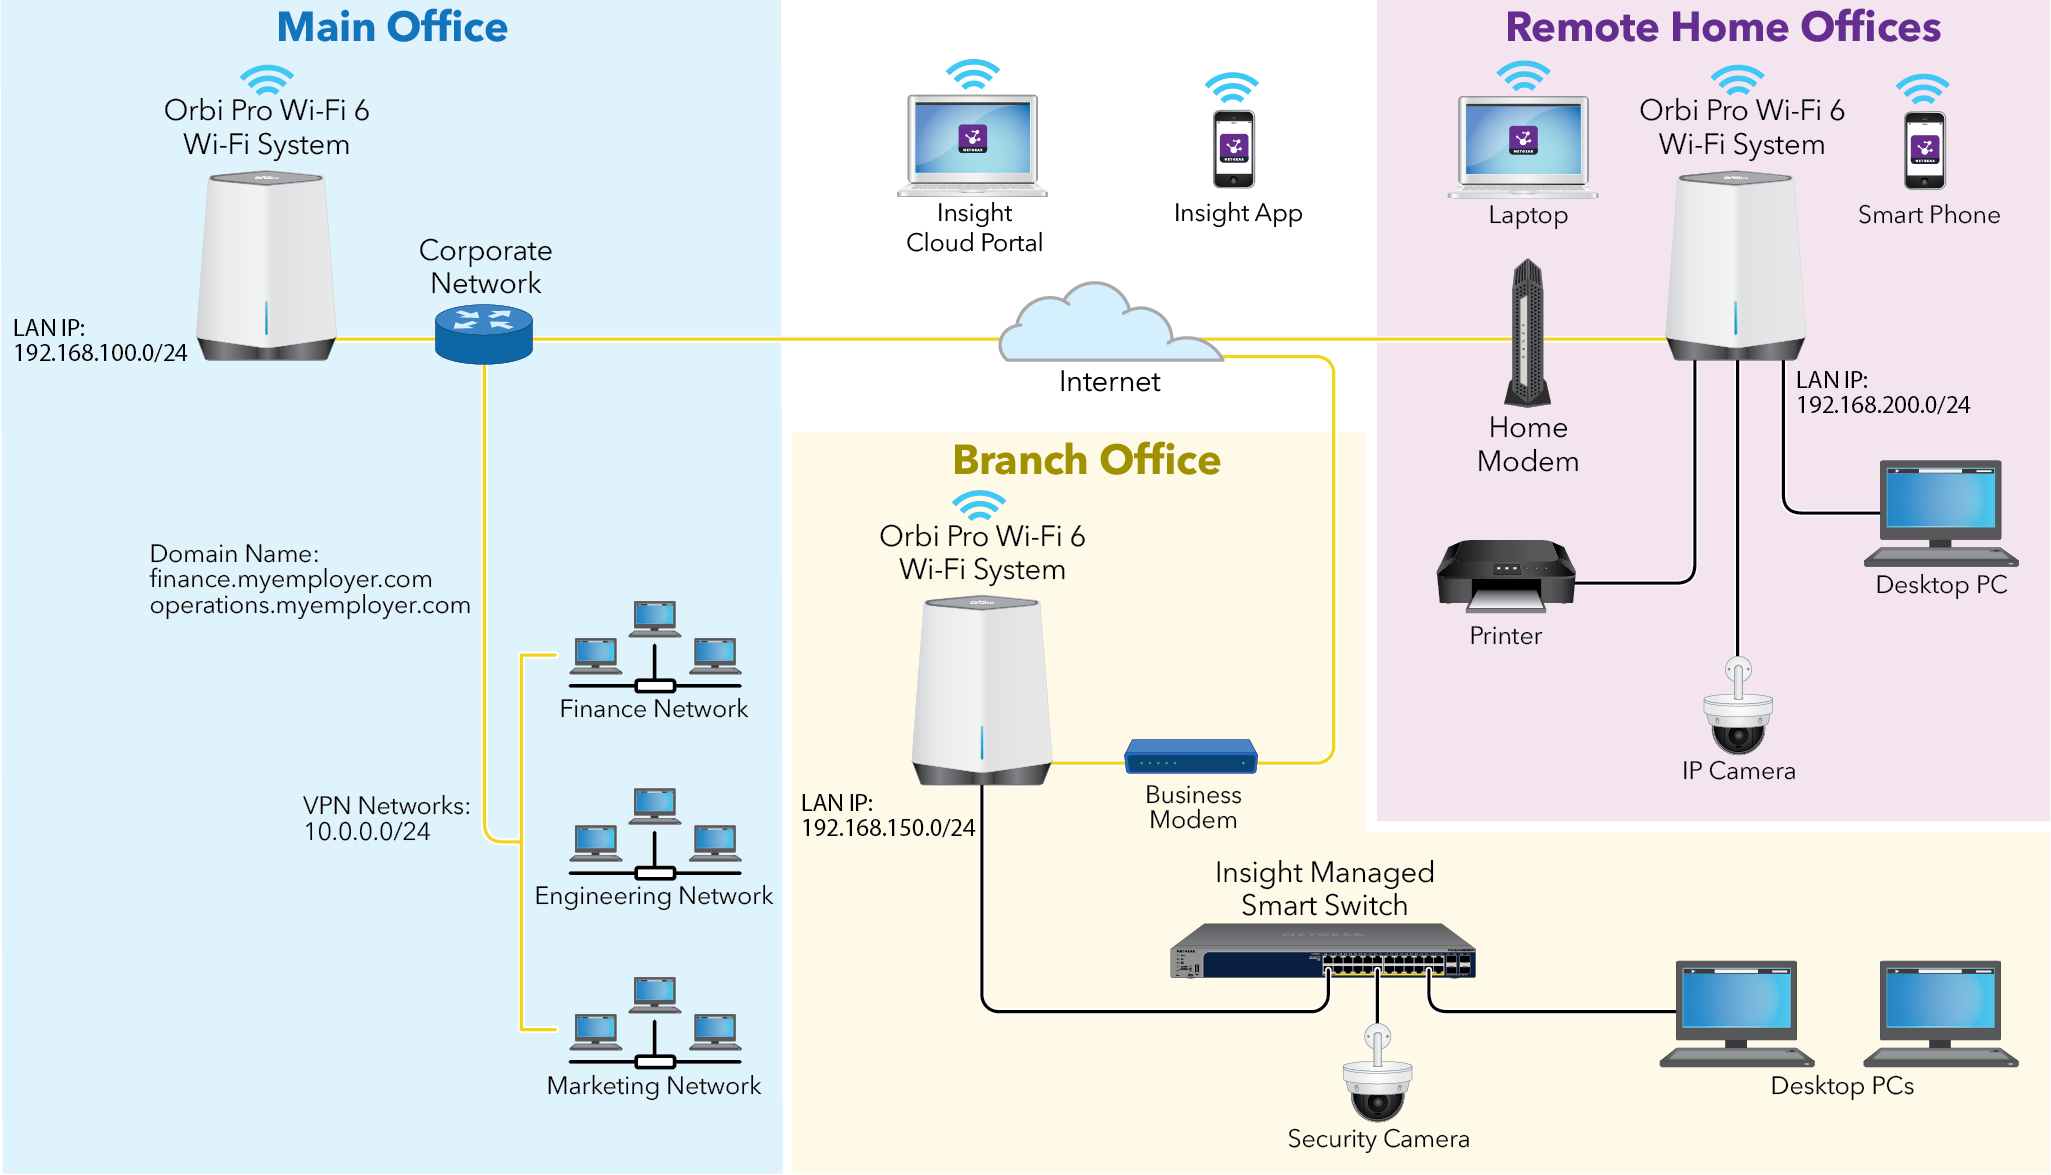
The following diagram shows a typical Insight Business VPN deployment:
To set up your Insight Business VPN service:
- Log in to your Insight account.
- If you have an Insight Pro account, select an organization.
- Select the location where your central office is located.
- Select Router/VPN > VPN Settings > +.
- In the Group Name field, enter a name for your business VPN.
- In the Description field, enter a description of your business VPN.
- In the Maximum Transmission Unit (MTU) field, enter a limit on the MTU size for the router's business VPN connection.
The MTU sets the transmission unit size that your business router can receive and transmit.
- Click the Domain Names through VPN slider button, if internal domain names are accessible through the VPN.
- In the Domain Name field, enter a domain name and click Next.
The Add Central Router page displays.
- Click Add Central Router.
The Central Router page displays.
- In the Select Location section, select the network location of your central office.
- In the Select Router section, select the central router from your main office.
After you select a router to be the central router, Insight automatically populates the Router IP Address and Router IP Subnet fields with the selected router's information.
Caution: If you specify a different IP address and IP subnet, Insight changes the central router’s LAN IP to the new value when you save the settings. - Select the VLAN Profile button.
A list of VLANs that are enabled on the central router displays.
- In the VLAN section, select the VLAN that is associated with the central router.
- In the VPN Networks field, enter the VPN network that the central router's Internet port is connected to.
The VPN networks are the local networks at the main office that are accessible by the central router's WAN port.
- Click Save.
The Router page displays.
- Click Add New Remote Router.
The Remote Router window displays.
- In the Select Location section, select the location of your branch or employee home office.
- In the Select Router section, select a remote router.
After you select a remote router, Insight automatically populates the Router IP Address and Router IP Subnet fields with the selected router's information.
- In the VPN Credits section, select an available business VPN credit to allocate to the remote router.
- Click the VLAN Profile slider button.
A list of VLANs that are enabled on the remote router displays.
- In the VLAN section, select a VLAN for the remote router.
- In the Router Mode section, select the Employee Home or Branch Office.
- (Optional) To enable router isolation on your employee home router, click the Router Isolation slider button.
The router isolation feature is only available for employee home routers. For more information, see What is Insight Business VPN router isolation?.
- Click Save > Next.
The Wireless Settings page displays.
- (Optional) To enable WiFi client access to the Business VPN service, select the VPN Wireless Network button.
- In the Security section, select security the type WPA2-PSK for the Business VPN SSID.
- Enter an SSID name and password for the Business VPN service.
- Click Next.
The Access Control page displays.
- (Optional) To add an access control list (ACL), in the Access Control section, select the + icon.
The Add New Device window displays.
An ACL adds a layer of security to your wireless network. For more information, see What are Access Control Lists (ACLs) and how do they work?.
- In the Device Name field, enter the name of the device.
- In the MAC Address field, enter the MAC address of the device.
- In the Rules field, select Allow or Deny.
- In the Select Router field, select a router to apply the ACL to.
- Click Save.
- Click Next.
Your Insight Business VPN service is set up.