

Bug Fixes:
- For compliance with California state law, the default “password” must be changed after logging into the switch.
- To configure SNMPv3, Authentication Protocol must be configured as MD5 or SHA. The ‘none’ option for Authentication Protocol is no longer allowed. If you upgrade firmware to V6.1.0.39 from an older version, clear your temporary internet files or browser cache to see the new settings.
- Added a new option under Security > Management Security > SCC Control to disable or enable Smart Control Center (SCC). It is set to Disable by default. If you upgrade firmware to V6.1.0.39 from an older version, clear your temporary internet files or browser cache to see the new settings. Note: The SCC Utility can still discover the switch even if the SCC option is disabled.
Notes
- SNMP community with public or private community string will be removed if upgrading from firmware version older than v6.1.0.39.
Known Issues:
- Master unit is unexpectedly changed after reboot the whole stack many times.
Workaround:Assign the master unit with a higher priority.
- Interface Shaping Rate doesn’t work on GS7xxTXS when shape is configured with min value 16.
Workaround:The min effective value is 51 in this release.
Upgrade Procedure:
- Download the new firmware 6.1.0.39 from NETGEAR product support Website and store it locally. The released zip file contains switch firmware (gs7xxtxs-v6.1.0.39.stk) and MIB files. Unzip the file to extract the switch image for your firmware upgrade..
Download Link : http://www.downloads.netgear.com/files/GDC/GS752TXS/GS728TXS_GS752TXS_V6.1.0.39.zip
- There are four methods to upgrade the new firmware from PC to the switch.
- HTTP
- TFTP
- USB
- SCC (Smart Control Center)
The following instructions explain how to upgrade the firmware via HTTP, which is the most convenient method. For the other three methods, see the User Manual. .
- To use HTTP, go to Maintenance > File Management > Dual Image > Dual Image Configuration to find the backup (next-active) image. .
- Assuming that the backup-image is image1, go to Maintenance > Download > HTTP File Download and set the File Type as Archive, Image Name as Image1, select the firmware file gs7xxtxs-v6.1.0.39.stk that you stored locally, and then click the Apply button to start downloading the firmware. .

Note: These instructions use image1 as an example. You can also download the image to image2.
Important: The download takes several minutes. Do not power cycle the switch until the success message shows.
- Go to Maintenance > File Management > Dual Image > Dual Image Configuration, and set Unit Number to All; set Image Name as Image1; select the Activate Image checkbox, then click the Apply button.’.
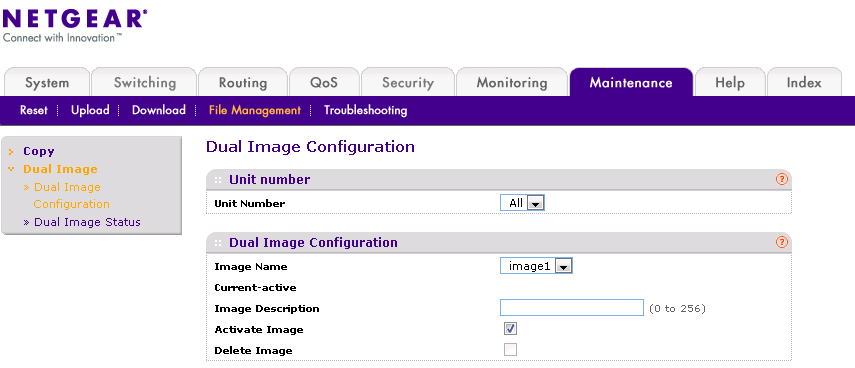
- Go to Maintenance > File Management > Dual Image > Dual Image Status to verify that firmware version 6.1.0.39 correctly downloaded to image1, and that image1 is the next-active image. If not, go back to step 3 to download the switch image again..
- Go to Maintenance > Reset > Device Reboot and set the Reboot Unit No. option to All (default option); select the check box, and then click the Apply button..

The restart may take several minutes.
Important: Do not power cycle or reboot the switch before the process is complete. - When the switch restarts, log in to the switch and go to System > Management > System Information to verify that the FW upgraded correctly..

Last Updated:07/07/2025
|
Article ID: 000061502