

Not what you're looking for? Return to the ReadyNAS Share and Permission FAQ.
To set the network access rights to an individual shared folder, you configure the network access settings for each file-sharing protocol used to access the shared folder on your storage system.
To set the network access rights for a shared folder:
- From the ReadyNAS Admin Page, select Shares > Shares.
A list of shared folders and LUNs on each volume displays.
- Click the
 of the share that you want to configure, then click Settings.
The share settings display in a pop-up screen.
- Click the Network Access tab.
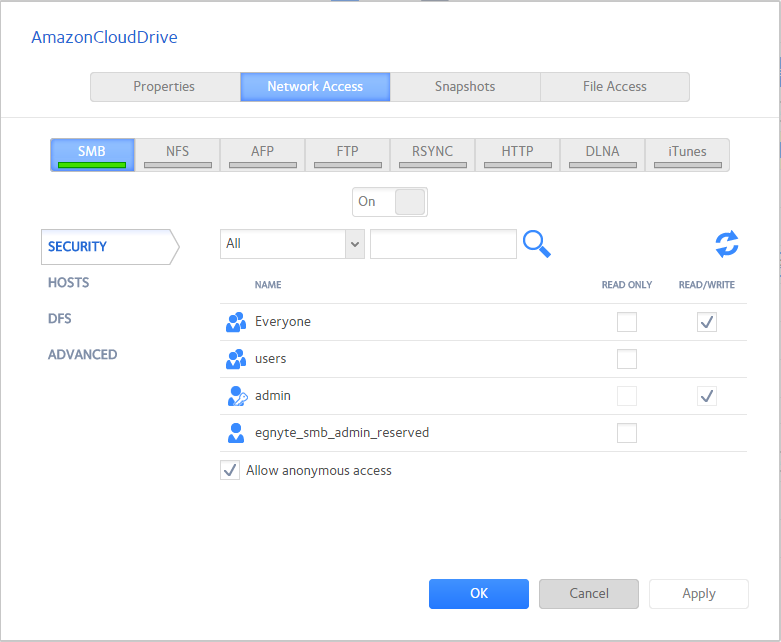
- Click one of the file-sharing protocol buttons
The screen adjusts to display the access properties for the selected protocol.
- Configure the network access settings for the selected protocol.
- Set the On-Off slider for the selected protocol:
- To enable the protocol for the selected folder, set the On-Off slider so that the slider shows the On position.
The indicator on the protocol button turns green.
Note: When you enable a file-sharing protocol for an individual shared folder, the protocol is also enabled globally. For more information about global settings, see Configure Global Settings for File-Sharing Protocols. - To save the configured access settings but prevent them from taking effect, set the On-Off slider so that the slider shows the Off position.
The indicator on the protocol button turns gray.
Note: When you disable a file-sharing protocol for an individual shared folder, the protocol remains enabled globally so that you can still access other folders that might be using the protocol. For more information about global settings, see Configure Global Settings for File-Sharing Protocols.
- To enable the protocol for the selected folder, set the On-Off slider so that the slider shows the On position.
- Click the Apply button.
- Click the OK button.
Your changes are saved and the pop-up screen closes.
Configure User and Group Settings
 ) or for Cloud users (
 ). For more information about Cloud users, see Access Shared Folders Using Cloud Services.
To configure user and group network access settings:
- From the ReadyNAS Admin Page, select Shares > Shares.
A list of shared folders and LUNs on each volume displays.
- Click the of the share that you want to configure, then click Settings.
The share settings display in a pop-up screen. - Click the Network Access tab.
- Select one of the file-sharing protocol buttons
The screen adjusts to display the access properties for the selected protocol.
- Click the Security tab on the left side of the pop-up screen.
- From the drop-down list, select the information that you want to view:
- All. The default group Everyone and all groups that you configured on the local database or that were downloaded from the Active Directory server are displayed. This is the default setting.
- Users. Only the individual users that you configured on the local database or that were downloaded from the Active Directory server are displayed.
- Groups. Only the groups that you configured on the local database or that were downloaded from the Active Directory server are displayed.
For information about using the local database or an Active Directory, see User and Group Management Modes.
Tip: To search for a particular user or group, use the search field next to the Search icon ( ).To update the user and group information, click the Refresh icon (
 ).
). - For each individual user (
 ) and group (
 ) that you want to access the shared folder, select one of the following check boxes:
- Read Only. The selected user or group is permitted only to read files on the shared folder.
- Read/Write. The selected user or group is permitted to read, edit, create, and delete files on the shared folder.
Note: If the ReadyNAS uses the local database, you can select the default group Everyone to grant all users and groups read-only or read/write access. - (Optional for SMB and AFP) Allow anonymous access to the shared folder.
If the ReadyNAS uses the local database and you grant the default group Everyone access, you can select the Allow anonymous access check box to allow anonymous access to the shared folder. In this situation, users are not required to provide their account credentials when accessing the shared folder.
- Click the Apply button.
- Click OK button.
Your changes are saved and the pop-up screen closes.
Configure Host Settings
For SMB, NFS, FTP, rsync, and HTTP, you can configure access rights for users on hosts. Host settings do not apply to AFP. The access rights that you configure for one host apply to all users on the host. For NFS, you can also configure the access rights that apply to any host, and, for individual hosts, you can configure whether root access is granted.
To add a host and configure host access settings:
- From the ReadyNAS Admin Page, select Shares > Shares.
A list of shared folders and LUNs on each volume displays.
- Click the of the share that you want to configure, then click Settings.
The share settings display in a pop-up screen. - Click the Network Access tab.
- Click one of the file-sharing protocol buttons
The screen adjusts to display the access properties for the selected protocol.
- Click the Hosts tab on the left side of the pop-up screen.
Note: If the host access list is empty, any host is allowed to access the shared folder. If you add at least one host to the list, access to the shared folder is restricted to hosts on the list only.
- Click the + button (
 ).
).

- Enter the host IP address in the IP address field.
- Click the Add button.
The host is added to the host access list.Note: For SMB, the access rights for each host depend on the access rights of the user.
- (Optional for rsync) Select the default access rights for users on the listed hosts:
- Read Only. The users on the listed hosts are permitted only to read files on the shared folder.
- Read/Write. The users on the listed hosts are permitted to read, edit, create, and delete files on the shared folder.
- (Optional for NFS and FTP) For each host on the host access list, select one of the following check boxes:
- Read Only. The users on the selected host are permitted only to read files on the shared folder.
- Read/Write. The users on the selected host are permitted to read, edit, create, and delete files on the shared folder.
Note: For NFS only, you can set access rights for AnyHost, which is a default entry in the host access list. You cannot grant root access to AnyHost. - (Optional for HTTP) For each host on the host access list, you can grant or deny access rights.
- (Optional for NFS) For each host for which you want to grant the users root access, select the Root Access check box.
- Click the Apply button.
Your changes are saved.
- Click the OK button.
Your changes are saved and the pop-up screen closes.
Configure Rsync Credentials
You can require users to enter rsync credentials when accessing your storage system using rsync.
To require credentials for rsync sessions:
- From the ReadyNAS Admin Page, select Shares > Shares.
A list of shared folders and LUNs on each volume displays.
- Click the of the share that you want to configure, then click Settings.
The share settings display in a pop-up screen. - Click the Network Access tab.
- Click the RSYNC file-sharing protocol button.
The screen adjusts.
- Click the Security tab on the left side of the pop-up screen.
- Select the Enable Password Protection check box.
- Click the + button () and create at least one rsync user account and password.
Note: Rsync credentials are completely separate from your ReadyNAS storage system’s user accounts.
- Click the Apply button.
- Click the OK button.
Your changes are saved and the pop-up screen closes.
Manage Access to Remote Shared Folders
The SMB protocol allows you to access remote shared folders on other network-attached devices and treat them as if they resided locally on your ReadyNAS system.
To enable access to a remote shared folder:
- From the ReadyNAS Admin Page, select Shares > Shares.
A list of shared folders and LUNs on each volume displays.
- Click the of the share that you want to configure, then click Settings.
The share settings display in a pop-up screen. - Click the Network Access tab.
- Click the SMB file-sharing protocol button.
The window adjusts.
- Click the DFS tab on the left side of the pop-up screen.
- Select the Enable DFS Root check box.
- Click the + button (
 ) above the list of remote shared folders.
 - Enter the following information:
- Name. The name of the remote shared folder, as you want it to appear on your ReadyNAS.
- Address. The IP address of the network-attached device where the remote shared folder resides.
- Remote share. The name of the remote shared folder, as it appears on the network-attached device.
- Click the Add button.
The new remote shared folder appears on the list.
- Click the Apply button.
- Click the OK button.
Your changes are saved and the pop-up screen closes.
- Make sure that the remote shared folder on the network-attached device is configured for file sharing.
You can now access the remote shared folder from your ReadyNAS system using the SMB protocol. For information about how to access your system using the SMB protocol, see Use a Windows Device or Use a Mac OS X Device.
Hide a Shared Folder
This feature is available for SMB only. Hiding a folder prevents users from discovering the folder unless they explicitly specify the folder name in the browse path.
To configure advanced settings for SMB:
- From the ReadyNAS Admin Page, select Shares > Shares.
A list of shared folders and LUNs on each volume displays.
- Click the of the share that you want to configure, then click Settings.
The share settings display in a pop-up screen. - Click the Network Access tab.
- Click the SMB file-sharing protocol button.
The screen adjusts.
- Click the Advanced tab on the left side of the pop-up screen.
- Select the Hide this folder check box.
- Click the Apply button.
- Click the OK button.
Your changes are saved and the pop-up screen closes.
Enable WebDAV
This feature is available only for HTTP (which includes HTTPS, which is required in some cases). WebDAV is an extension of the HTTP protocol that facilitates document management and editing. Features of WebDAV include maintenance of document properties such as author, creation date, and modification date, and it provides overwrite protection. Access is to a shared folder and the contained files.
After you enable WebDAV access, you can access the files in the shared folder over the Internet from a computer or mobile device in a manner similar to accessing the files over a LAN or through a VPN. The specifics depend on the device and application using WebDAV.
To enable WebDAV on an individual shared folder:
- From the ReadyNAS Admin Page, select Shares > Shares.
A list of shared folders and LUNs on each volume displays.
- Click the of the share that you want to configure, then click Settings.
The share settings display in a pop-up screen. - Click the Network Access tab.
- Click the HTTP file-sharing protocol button.
The screen adjusts.
- Click the WEBDAV tab on the left side of the pop-up screen.
- Select the Enable WebDAV check box.
- Click the Apply button.
- Click the OK button.
Your changes are saved and the pop-up screen closes.