

You can add a 3.5-inch hard disk drive, 2.5-inch hard disk drive, or a 2.5-inch solid-state drive to an empty drive bay.
Note: Some reports have come in that some models of 6 TB drives do not fit the tool-less design disk tray. To properly install a drive that won't fit in the disk tray, remove the bracket and screw the drive into the tray. Double check your drive on the Hard Disk Compatibility List
If you want to add a previously formatted disk to your storage system, see the How do I reformat a previously formatted disk on my ReadyNAS OS 6 desktop storage system
To add a 3.5-inch hard disk drive (HDD):
- Determine whether you need to shut down your system:
- If you are adding disks to a diskless system, gracefully shut down the system.
- If your system is operating with one or more disks, you can add disks while the system is running. You do not need to shut down the system.
- If necessary, slide the disk tray handle locking mechanism to the unlocked position.
- Press the disk tray release latch.

The disk tray handle pops out. - Pull out the disk tray.
- Separate the mounting bracket from the disk tray:
- Press and hold the disk tray release latch.
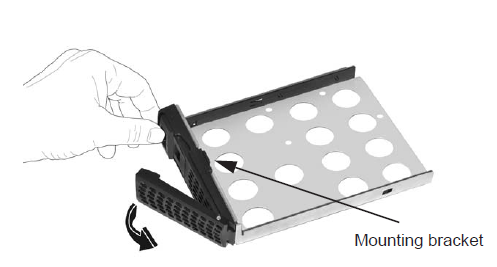
- While holding the disk tray release latch, pull out the mounting bracket and slide the bracket down the tray.

- When the mounting bracket is partially removed from the disk tray, the disk tray locking mechanism locks the mounting bracket to the disk tray.
- You do not need to fully remove the mounting bracket from the disk tray.

- Press and hold the disk tray release latch.
- Attach the new HDD to the mounting bracket.
- Make sure that the HDD mounting holes are aligned with the bracket's mounting posts, and that the HDD connectors face the interior of the drive tray.
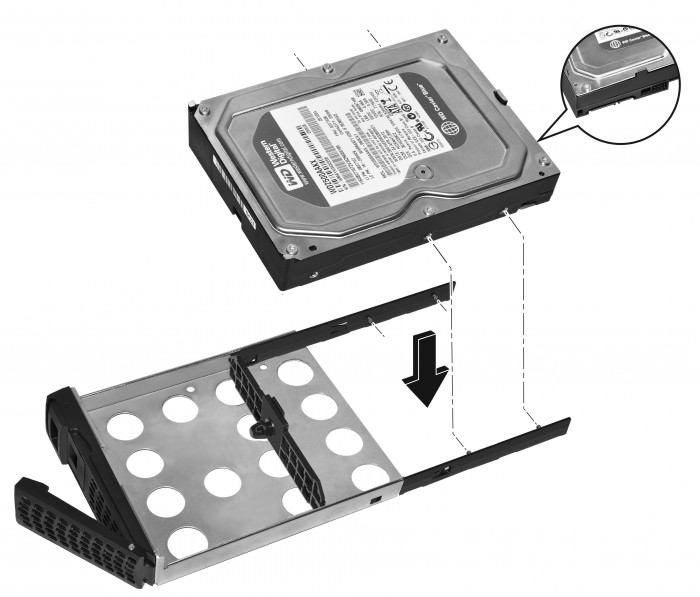
- Make sure that the HDD mounting holes are aligned with the bracket's mounting posts, and that the HDD connectors face the interior of the drive tray.
- Push the mounting bracket and HDD back into the disk tray.

The following figure shows a fully assembled disk tray:
WARNING: To prevent damage to your system, make sure that the disk tray is correctly oriented before inserting it into the drive bay.
- Insert the disk tray back into the drive bay of the storage system.
- For 2-bay and 4-bay systems, insert the disk tray so that the disk tray release latch is near the bottom of the system.
- For 6-bay systems, insert the disk tray so that the disk tray release latch is on the left side of the system.
- Press down on the disk tray handle until it latches closed.
The disk tray is secured in the drive bay. - If necessary, turn on your system by pressing the Power button.
If the disk that you added was not previously formatted, the system uses the disk in one of the following ways:
- If you are adding the disk to a system that uses X-RAID2, the system automatically determines whether the disk is used for protection or storage. The new disk is incorporated in the background while you continue to use your system.
- If you are adding the disk to a system that uses Flex-RAID, the disk becomes available for use. You use the local admin page to manually configure the new disk.
For more information about X-RAID2, Flex-RAID, and using the local admin page, see the ReadyNAS OS 6 Software Manual, available at the ReadyNAS OS 6 support page.
To add a 2.5-inch hard disk drive (HDD) or 2.5-inch solid-state drive (SSD):
- Determine whether you need to shut down your system:
- If you are adding disks to a diskless system, gracefully shut down the system.
- If your system is operating with one or more disks, you can add disks while the system is running. You do not need to shut down the system.
- If necessary, slide the disk tray handle locking mechanism to the unlocked position.
- Press the disk tray release latch.
The disk tray handle pops out. - Pull out the disk tray.
- Remove the mounting bracket inside the disk tray:
- Press and hold the disk tray release latch.
- While holding the disk tray release latch, pull out the mounting bracket, slide the bracket down the tray.
When the mounting bracket is partially removed from the disk tray, the disk tray locking mechanism locks the mounting bracket to the disk tray. - Release the mounting bracket from the locking mechanism by pushing a pen through the locking mechanism on the side of the disk tray.
- Slide the mounting bracket out of the disk tray.
The mounting bracket is not used to secure 2.5-inch HDDs or SSDs
- Press and hold the disk tray release latch.
- Place the new 2.5-inch HDD or SSD in the disk tray.
- Secure the HDD or SSD to the disk tray using the screws that came with your storage system.
- Make sure that the HDD or SSD connectors face the interior of the disk tray.

The following figures show fully assembled disk trays with a 2.5-inch HDD or 2.5 SSD:

Disk tray with 2.5-inch HDD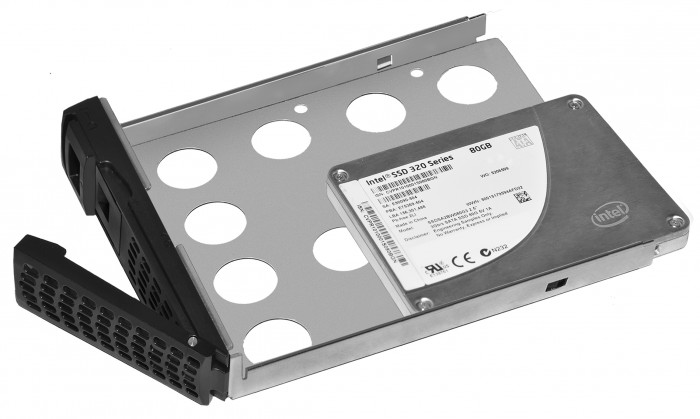
Disk tray with 2.5-inch SSDWARNING: To prevent damage to your system, make sure that the disk tray is correctly oriented before inserting it into the drive bay.
- Make sure that the HDD or SSD connectors face the interior of the disk tray.
- Insert the disk tray back into the drive bay of the storage system.
- For 2-bay and 4-bay systems, insert the disk tray so that the disk tray release latch is near the bottom of the system.
- For 6-bay systems, insert the disk tray so that the disk tray release latch is on the left side of the system.
- Press down on the disk tray handle until it latches closed.
The disk tray is secured in the drive bay.
- If necessary, turn on your system by pressing the Power button.
If the disk that you added was not previously formatted, the system uses the disk in one of the following ways:
- If you are adding the disk to a system that uses X-RAID2, the system automatically determines whether the disk is used for protection or storage. The new disk is incorporated in the background while you continue to use your system.
- If you are adding the disk to a system that uses Flex-RAID, the disk becomes available for use. You use the local admin page to manually configure the new disk.
For more information about X-RAID2, Flex-RAID, and using the local admin page, see the ReadyNAS OS 6 Software Manual, available at the ReadyNAS OS 6 support page.