

You can use FrontView to back up data that is stored on your ReadyNAS system to another network-attached device.
The following figure illustrates the backup process described in this section.

- ReadyNAS system serving as backup source
- USB drive serving as backup destination
- Backup process
Backup and recovery jobs ReadyNAS Vault and Time Machine require different procedures. For more information, see the following support articles:
To back up data stored on your ReadyNAS system, follow these steps:
- Select Backup > Add a New Backup from the FrontView Main menu.
The Add a New Backup Job screen displays.
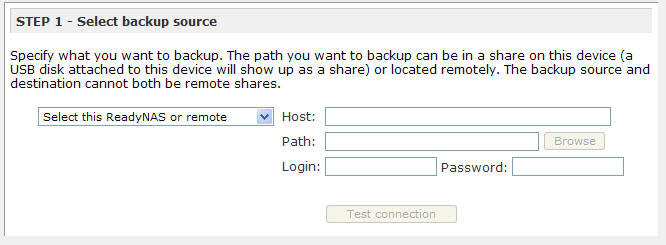
- From the drop-down list in the STEP 1 - Select backup source pane, select a backup source from your ReadyNAS system.
Depending on how your ReadyNAS system is configured, these options vary. If you have previously created one or more iSCSI targets on your ReadyNAS system, you can choose an iSCSI target as your backup source. - From the drop-down menu in the STEP 2 - Select a backup destination pane, select a backup destination that is not part of your ReadyNAS system.
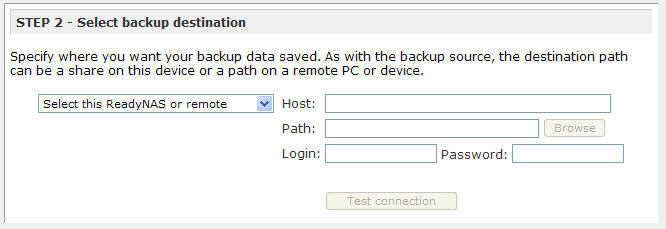
Depending on how your network is configured, these options vary. Select USB device that is attached to your ReadyNAS system or a remote location. - If necessary, enter the remote host name, the folder path, and any login credentials required to access that path.
If you select a backup destination that requires a path, use a forward slash (/) to separate directories, for example:
/<share name>/<folder name>
Do not use a backslash () in paths.
If you select a a USB device that is connected to your ReadyNAS system, you can leave the path blank to put the data at the top level of the USB device's directory, or enter a folder path to place the backed-up data in a specific folder.
If you select a remote Rsync server, you must enter the Rsync server's host name and a path. Depending on how the Rsync server is configured, you might need to enter a user name and password. Whether or not you need to enter login credentials depends on how the Rsync server is configured. For more information, contact the Rsync server's system administrator.
- (Optional) To ensure that you are able to access the remote backup destination, click the Test connection button.
A pop-up window displays indicating whether you can access the destination.
- From the STEP 3 - Choose backup schedule pane, determine whether this backup job will run automatically or whether it must be started manually, as follows:
/Backup_Step3.jpg)
- Run backup job automatically. Select the Perform backup every check box and use the day check boxes and time drop-down lists to create a backup schedule.
Backups can occur as frequently as every 4 hours. You can also set them to run daily or one time each week. The time settings determine when the backup job starts. Depending on the size of the backup job, it might not finish by the later time setting.
The backup schedule is offset by 5 minutes from the hour.
- Require backup job to be started manually. Clear the Perform backup every check box.
- Run backup job automatically. Select the Perform backup every check box and use the day check boxes and time drop-down lists to create a backup schedule.
- Using the drop-down lists and check boxes in the Step 4 - Choose backup options pane, configure backup options:
/Backup_Step4New.jpg)
- Choose an option from the Schedule a full backup drop-down list.
The first full backup is performed at the next scheduled occurrence of the backup, depending on the schedule you specify. The next full backup is performed at the interval you choose calculated from this first backup. Incremental backups are performed between the full backup cycles.
When you backup your ReadyNAS system to a website or FTP site, you can only do a full back up every time.
- Using the On backup completion, send drop-down list, choose what type of logs to send when the backup job completes.
You can send a log that lists only errors encountered during backup, full back up logs consisting of file listings (can be large), or status and errors (status refers to completion status).
Backup log emails are restricted to approximately 10,000 lines.
- (Optional) Select the Remove files from backup destination check box. Select this check box if you want to erase the destination path contents before the backup is performed.
WARNING!
When using this option, ensure that you have correctly identified your backup source and backup destination. If you reverse them, you might permanently delete your source files. NETGEAR recommends not enabling this option unless your destination device is very low on storage space.
Best practice is to experiment with this option using a test share to make sure that you understand how it works.
- (Optional) Select the Change ownership of backup files check box.
Your ReadyNAS system attempts to maintain original file ownership whenever possible. However, you can automatically change the ownership of the backed-up files to match the ownership of the share. This allows anyone who can access the backup share to have full access to the backed-up files.
- (Optional) Select the Wake-on-LAN check box and enter the MAC address of destination device.
Use this option whenever the destination device is set to power down automatically. If you do not set this option and the device is powered down when the backup job is scheduled to begin, the backup job might not happen.If your destination device is set to power down automatically, you must also configure the destination device to accept wake-on-LAN notifications. If you do not configure the destination to accept wake-on-LAN notifications, and it is powered down when the backup job is scheduled to begin, the backup job might fail.
- Choose an option from the Schedule a full backup drop-down list.
- Click the Apply button.
Your backup job settings are saved and this backup job displays in the backup schedule.
If you set a backup schedule for this job in Step 6, your backup job starts at the date and time you specified.
If you did not set a schedule for this job in Step 6, you must manually start the backup job by pushing the Backup button on your ReadyNAS unit or by manually starting the backup job using FrontView. For more information about the location of the Backup button on your system, see the appropriate hardware manual.
Before trusting your backup job to a schedule, it is a good practice to manually perform the backup to make sure that access to the remote backup source or destination is granted, and that the backup job can be done within the backup frequency you selected. You can do this after you save the backup job.
Last Updated:07/07/2025
|
Article ID: 21344